
Design your own necklace pendant with gelli plate prints. Using your favorite colors create your own custom pendant designs.
Not gelli plate printed before? It is super easy, follow my how to gelli print guide. I will guide you step by step to making your own custom necklace.


Materials to design your own necklace pendant
- Acrylic paint
- Gelli Plate
- Brayer (roller)
- Paper for printing
- Acrylic matt medium
- Resin kit
- Wooden blanks
- Mixing cups and sticks
- Craft knife and scissors
- Cord for necklace pendant
- Jewelry fittings
Step 1: Create Gelli Plate Prints
- Squeeze a small amount of acrylic paint onto your Gelli plate.
- Use a brayer to spread the paint evenly across the plate.
- Place a piece of paper on the painted Gelli plate and gently press it down.
- Lift the paper to reveal your Gelli plate print. Experiment with colors and patterns.
- There is no need to stop with one layer of paint, add stencils, add various colors to build up patterns, to create prints that represent your own unique style.


Step 2: Prepare your wooden backs
- Apply acrylic matt medium to the wooden backing to seal the wood. Allow to dry.
- Repeat on the second side.
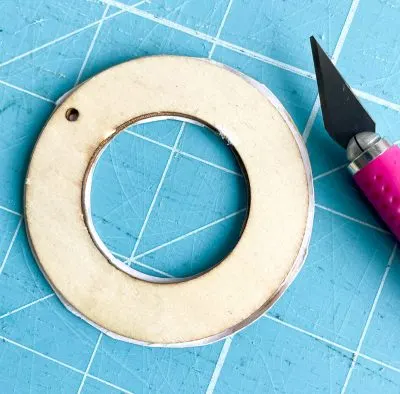
Step 3: Cut Your Print
- Select the area of print you wish to use. Place your wooden blank onto the print and draw around with a pencil.
- Using the pencil lines as a guide cut out your gelli printed paper.


Step 4: Adhere Your Print
- Using acrylic matt medium adhere the cutout print to the wooden blank.
- Press it down carefully to ensure there are no air bubbles.
- Paint the print with acrylic matt medium to seal the print. Allow to fully dry.
- Trim any excess paper with a sharp craft knife (if it’s blunt the paper will rip, I speak from experience!).

Step 5: Mix Resin
- Follow the instructions on your resin kit to mix the resin and hardener in a mixing cup, ensuring you are wearing safety gloves to protect your hands.
Step 6: Pour Resin onto the Pendant
- Place your pendant on a level surface, somewhere where you can leave it for 24hrs to dry without moving.
- Carefully apply resin starting in the middle of the design, ensuring the resin reaches all the edges.
- Use a toothpick or stick to remove any air bubbles.


Step 7: Let It Cure
Cover the pendant to protect it from dust, an upside down mug works well. Allow the resin to cure according to the manufacturer’s instructions, typically for 24-48 hours.
Step 8: Add a Necklace Cord
Cut a piece of cord the desired length plus an extra inch.
Fold in half and loop through the pendant design, as shown.


Add jewelry fixtures to the cord, using pliers.


Enjoy Your Unique Necklace Pendant
Your custom necklace pendant with Gelli plate print and resin is ready to wear or give as a perfect gift. Wear your custom piece and receive compliments from admirers.
Have fun experimenting with different Gelli plate prints and designs to create truly unique pendant necklaces in a variety of different styles.


Lisa from Cucicucicoo
Saturday 4th of November 2023
These are so pretty and such a great way to use your beautiful textured prints!
Vicky Myers
Monday 6th of November 2023
Thanks Lisa