
Today I am super excited to share my experiments in cyanotype art with you, warts and all! Cyanotype printing is a great way to create your own original artwork.
DIY cyanotype sunprint art is great fun, and a fabulous way of capturing snapshots of nature from around your home.
I have chosen to add hand stitching to my original cyanotype art prints but this is totally optional.


I have made several mistakes along the way with making cyanotype art so I will share them with you so you don’t have to waste your time making the same mistakes!!
Table of Contents
Cyanotype
So what is cyanotype in the first place? Put simply it’s a photographic printing process first designed in the 19th century by Sir John Herschel which creates cyan-blue print. The cyanotype light-sensitive solution is applied to paper or fabric. Different objects are placed on top of the dried solution and exposed to direct sunlight or UV light. Once removed and the paper washed a negative image is created.


Before you start your cyanotype art learn from my mistakes – I strongly suggest carrying out test strips of cyanotype paper first so you have a good idea how long to expose the paper to light for. Exposure times vary according to the seasons – In summer this can vary between 8-16 minutes and in winter between 30-60 minutes. My first set of prints just washed away down the sink due to my impatience!
Think about the level of detail and size of the objects you use. I originally collected small items on a daily walk whilst on my summer hols in France. I was super excited to create a grid picture with my small natural items only to find I just was not satisfied with the lack of details.


For my third attempt at cyanotype art prints, I chose bigger leaves from around the garden, with much more success.


Materials for cyanotype art
- Cyanotype solution or ferric ammonium citrate and Potassium Ferricyanide
- Foam brush or a regular paint brush
- Paper
- Sheet of glass or perspex (I borrowed one from a picture frame)
- Objects – If using natural objects such as leaves I suggest pressing in a heavy book to flatten first as flat objects work best
- Embroidery Threads and needle
How to make a cyanotype print
If you have powder form prepare your cyanotype – I made up 7g of Potassium Ferricyanide and 14g Ferric Ammonium Citrate added to 125ml of water. this gave me more than enough to prepare several sheets of paper.
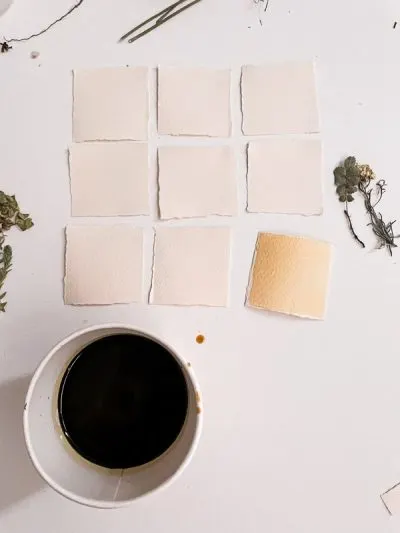
I sourced various types of paper from Scrapbox this is a recycling second-hand shop, a treasure trove of all sorts! I collected various papers to experiment with, from card to watercolor paper to thin paper.


In a darkened room paint your papers with your mixed solution and set aside to dry. It is very important to keep the room dark so as not to ruin the chemical reaction.

Once your papers are dry place your objects into the paper, and hold in place with a sheet of glass. You don’t want any leaves blowing away!


Place outside and expose to direct sunlight. The paper will change from a dirty yellow to a dark blue color.


Rinse the paper under running water for a couple of minutes to wash the cyanotype away, leaving a print on your paper.


Set aside to dry.


How to embroider your art cyanotype print
After my various experiments with card, watercolor paper, and thin paper I decided to add some embroidery to my cyanotype prints, inspired by Betz White.
Before I started experimenting with stitching I ironed on fusible interfacing onto the back of the prints. This added strength to the paper.
Draw pencil lines where you plan to stitch, then pin prick from the front of the paper along the pencil lines ready for stitching. These pinpricks act as a very useful guide when inserting the needle from the back of the paper. Unlike fabric paper is not forgiving, any needle hole you make will show so I like to know exactly where to insert the needle.


That said you can always change your mind and carefully unpick, using the same paper holes for different stitches (you can see I started with chain stitch and then changed it out). Feel free to play with different types of stitches, from plain running stitch, chain stitch, or even french knots.


As you gain in confidence I suggest rubbing out the pencil marks before stitching. Personally, I love the effect of variegated threads.


My final dilemma is whether to frame the three art prints as cyanotype art or whether to make three individual gift cards from them.


Frequently Asked Questions for the Cyanotype Process
How much cyanotype solution do I need? this depends on how much paper you wish to cover or if you are printing onto fabric. 25g of Ferric Ammonium Citrate + 10g of Potassium Ferricyanide will coat roughly 50 sheets of A4.
Can I keep the mixed cyanotype solution and if so for how long? If you are mixing the sensitive emulsion yourself keep it in a dark bottle in a dark room for up to a week. If you have bought the cyanotype solution premade follow the manufacturer’s instructions.
Can I keep prepared printing papers? Yes, I strongly recommend keeping the photosensitive paper in a dark envelope so no sunlight can reach them, I would even go so far as suggesting placing the dark envelope into a dark airing cupboard.
Looking to explore different printing techniques you can do at home? Check out how to make gelli plate prints, equally as addictive.
Today I am taking part in September’s Sustainable Craft Challenge, the theme is Nature. Do check out my blogging friend’s posts.
- Mini Vases upcycled from yogurt bottles
- Eco Friendly Fall Decorative Wreath
- Three-Strip Flower Scarf
- Pressed Flower Lantern
- Sea Glass Candle Holder
- Flower Pounding on Paper – A Complete Beginners Guide
- DIY Fall Sign Gold Dried Leaves
- Upcycled Project Bag


maria
Wednesday 6th of September 2023
This is beautiful I would love to make this since my color scheme is blue and white.
Sew Crafty Crochet
Wednesday 6th of September 2023
I love these prints! I especially love the embroidery stitching. I would definitely frame them and put them on the wall.
Maria Brittis
Tuesday 5th of September 2023
These are gorgeous! The color is perfect. I want to make these for my home since my color scheme is blue and white.
Gail @Purple Hues and Me
Tuesday 5th of September 2023
Oh my, another wonderful technique I am not familiar with! Your cyanotype art looks amazing and I would love to try it! Thank you for sharing, Vicky!
Vicky Myers
Tuesday 5th of September 2023
Its such fun to try - you will love it :)
Terri Steffes
Tuesday 5th of September 2023
Ooo, I love the gift card idea. How sweet would those be! I also think that they would make an awesome grouping as a "quilt." I imagine it would be so unique, especially with the stitching.
Vicky Myers
Tuesday 5th of September 2023
Ooh a fabric quilt in this style would be amazing.