
Tie Dye is such a fun activity for any age, with endless possibilities. It is super easy, let me show you how to tie dye. I have lots of different tie-dye patterns and projects for you to try.
The art of tie dye is very simple. Folds or crumpling of fabric combined with tieing the fabric stops dye reaching all parts of the fabric, thus creating a tie dye pattern. The elastic bands or thread tieing te fabric acts as resists.

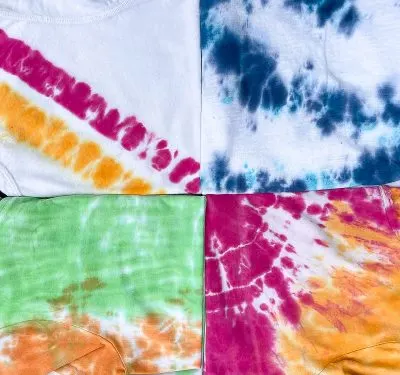
Table of Contents
Types of Tie Dye
Traditional Tie Dye
This is the most common form of tie dye. Popular in the 60’s and 70’s this continues to be in vogue. Bright coloured patterned clothes can be frequently seen at festivals.
Ice Dye
For this method you add dye powder to your fabric, followed by ice cubes. As the ice melts it mixes with the powdered dye and drips into the fabric. A wire rack is really helpful as it allows the melted ice cube to drip through the fabric. A more unpredictable method but great fun! Read more about how to ice dye
Bleach Dye
Bleach tie dye, also called reverse tie dye, is super useful for dying dark fabrics lighter. The bleach lightens exposed fabric, creating the tie-dye design. I love using this method for reverse tie dye for old jeans.
Different Types of Dye for Tie Dying
- Procion Dye: This is a fiber reactive dye that is popular for tie dying. It is especially suited for cotton and other natural fibers and bonds well to the fabric. Once the dye is applied, it penetrates the fiber and forms a permanent bond, creating a vibrant and long-lasting color.
- Acid dyes: These dyes are primarily used on animal fibers such as wool and silk. They are not suitable for cotton or other cellulose fibers as they require an acidic solution to bond to the fabric. The color intensity and vibrancy depend on the type of fiber and the strength of the acidic solution.
- Direct dye: Direct dye is best suited for cotton and other natural cellulose fibers. It is easy to use and does not require any special chemicals or procedures. However, the color may fade over time and may not be suitable for long-term use.
- Reactive dyes: Reactive dyes are primarily used on cotton fabrics and other natural fibers. They react with the fabric to create a permanent bond, resulting in intense and vibrant colors. The process requires the use of special chemicals and procedures, making the process more involved than other dyes.
- Natural dyes: Natural dyes are derived from plant sources and are an eco-friendly option for tie dying. They create subtle, muted tones and are not as vibrant as synthetic dyes. The color intensity may also fade over time. However, natural dyes offer a unique and earthy look that is ideal for certain projects. Take care to research mordants when considering natural dyes.
Personally, I like to keep it simple. For bright different colors I gravitate to tie dye kits from craft stores where I simply add water to a bottle with dye powder and give it a shake, or if I’m creating a project with single color I use Dylon dye for dying clothes at home. I have found several one-step tie-die kits in charity shops.


Prepare your Work Area
It is a good idea to use a plastic table cloth to protect your flat surface, protective clothing for yourself along with rubber gloves. It’s also handy to have readily available some old cloths or paper towels for mopping up any excess dye.
Tie Dye Materials
- White fabric (cotton, rayon, hemp or silk)
- Fabric dye
- Elastic bands or string
- Plastic or metal bowl
- Rubber gloves
- Plastic wrap or a plastic bag
- Water
How to Tie Dye
- Choose the fabric: Select the fabric that you want to tie dye, it should be a light color like white or light beige. Natural materials like cotton, rayon, hemp or silk work best.
- Prepare the dye: Mix the dye according to the instructions on the package in a plastic or metal bowl. Use water as indicated on the dye instructions.
- Prepare and fold the fabric: There are different folding techniques to get different tie-dye patterns.
- Tie the fabric: Once the fabric is folded, tie rubber bands or string around the pleats. The more rubber bands or string used, the more white lines will appear in the final design.
- Dye the fabric: Put on rubber gloves and gently place the fabric in the dye, leave it in for as long as the dye instructions indicate. Stir occasionally and make sure the dye gets into all of the folds. Or if you are using dye in bottles apply to the fabric.
- For the best results allow the fabric to absorb the dye – the longer you leave it the stronger the color will be.
- Rinse and dry: Once the fabric is fully dyed, rinse it thoroughly in cold running water until it runs clear. Then remove the rubber bands or string and rinse again. Finally, squeeze out the excess water and line dry the fabric.
Different Techniques for Folding Your Fabric for Tie Dye Patterns
- Tie-dye hearts
On your cloth draw a heart onto the fabric using taylors chalk.


Carefully fold the fabric using the drawn line to guide you. When all the fabric is folded your drawn line should be clearly seen as a straight line across the top of the folds.


Tie the folds with string or use rubber bands. Apply your dye.


You may need to wash your fabric to remove the taylors chalk.


- Bulldog tie dye
Lay out the fabric flat. Pinch the center of where you want the bulldog. Pull the pinch upwards and gather the fabric into folds.


Tie the folds and apply the fabric dye.


- Scrunch or Nebula Design Tie Dye
Using your fingers crumple, scrunch, wrinkle and gather your fabric.


Tie the crumpled fabric with string or use rubber bands. The more you tie the crumpled fabric the greater areas of white.


Apply your dye to all sides of the fabric.


Crumple tie dye is my all time favourite pattern.


- Spiral Pattern Tie Dye
Pinch the center of your spiral and twist the fabric clockwise.


Try and keep the folds the same height. Tie the folds with string or use rubber bands. Apply your dye.


Add dye to each section.


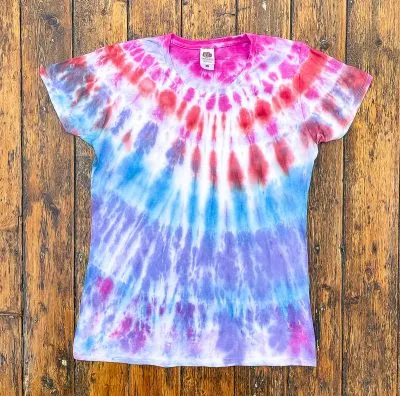
- Stripes Tie Dye Pattern
Fold your fabric, I have chosen to work with 15 mm to 20mm pleats. For horizontal stripes fold the fabric vertically, for vertical stripes fold the fabric horizontally and for diagonal stripes fold the fabric diagonally.


Once the fabric is folded tie with elastic bands.


Apply your dye. You may choose to create stripes as per the example. In this case place the dye between two sets of rubber bands, a squeeze bottle is very helpful for applying the dye.


- Square Folds Tie Dye
Fold your cloth into large pleats, mine are about ten cm.


Carefully fold the fabric into rectangles. Cut two pieces of cardboard and place either side of the folded fabric.


Tie the bundle with string or use rubber bands. Place your fabric into fabric dye.


- Fan Fold Tie Dye
Fold your t shirt in folds.


Once the fabric is folded tie with elastic bands. Apply your dye. For this pattern start with a fold down the center of the t shirt and work out sideways.

- Triangular folds tie dye
Fold your cloth into large pleats, mine are about ten cm.
Carefully fold the fabric into rectangles. Cut two pieces of cardboard and place either side of the folded fabric.


Carefully fold the fabric into triangles. Cut two pieces of cardboard and place either side of the folded fabric.


Tie the folds with string or use rubber bands. Apply your dye.


- Side Circle Tie Dye
On your cloth draw a semi-circle onto the fabric using taylor’s chalk.


Carefully fold the fabric using the drawn line to guide you. When all the fabric is folded your drawn line should be clearly seen as a straight line across the top of the folds.
Tie the folds with string or use rubber bands. Apply your dye.


- Sparks Tie Dye Pattern
On your cloth draw a semi circle onto the fabric using taylors chalk.


Tie the folds with string or use rubber bands. Apply your dye.


- Waves Tie Dye Pattern
Wrap your fabric around a piece of piping – something long and circular. For this t shirt I have started with the bottom edge of the shirt, wrapping it around the tube.
Secure with elastic bands.


Add twine, securing with a knot at one end, then wrap tightly around the tube until you reach the opposite end. tie to secure.
Now push the shirt from both ends towards the middle of the tube, this creates more areas of resist thus increasing the white areas.


.
Apply your dye and allow a long time for setting.


Frequently Asked Questions for how to Tie Dye
How long do I let the tie dye sit? Generally, six hours is a good length of time, this allows the dye to deepen and soak into the fabric.
How do I keep the fabric moist while the dye deepens? Use plastic wrap or a plastic bag to cover the fabric right after tying it up to prevent the dye from drying out during the process.
How do I create a lighter effect? Dilute the dye according to the instructions on the package.
Why do I rinse the cloth before unfolding it? This keeps the white fabric staying white, so that any remaining dye does not run onto the white areas when rinsing.
How do I wash tie dye shirts? Follow the kit or dye instructions, but personally, whatever the instructions, I always wash separately the first time just in case there is some dye residue that may run. Color run sheets in the wash give a little extra security for future washes.
How do I get tie dye off my hands? It’s best to avoid getting tie dye on your hands in the first place – I speak from experience! I suggest washing your hands using a nail brush, doing the washing up, and having a shower.
Project suggestions for your beautiful tye-dye fabric
Over the years I have completed many tie-dye projects, and I am sure you will find inspiration from them!
- Quilt with tie-dye denim
- Tie Dye Floor Cushion
- Tie Dye Pouches
- Tie dye table runner and placemats
- Tie Dye Scarf
- Tie Dye Blanket
I hope you have enjoyed this detailed tutorial on how to tie dye. The possibilities for tie dye patterns are endless, and the results are easily incorporated into lots of different creative projects.
Not ready to start your tie-dying journey? then why not pin for later.


Looking for further all age craft techniques this summer then check out gelli printing.


Lisa at Cucicucicoo Eco Sewing and Crafting
Monday 31st of July 2023
Very interesting! I didn't know there were so many types of tie dye!