
This free sewing pattern makes three different sizes of a boxy zipper pouch which are great for small personal items, such as cosmetics, and even small toys. Unlike most free patterns this box pouch has no seams exposed.
I love working with old jeans, worn denim has such a lovely feel to it and it is so hard wearing. It recently dawned on me that I have never made my husband a toiletry bag. After reading many versions for boxed pouch bag instructions I came up with my own. This sewing tutorial lines the box bag hiding the internal seams. Keep reading for my box bag tutorial. If you love bag pattern check out all my free bag patterns and tutorials.

I have sewn up a variety of sizes of the box pouch pattern, which are perfect for home, camping, and festivals – they are so versatile.
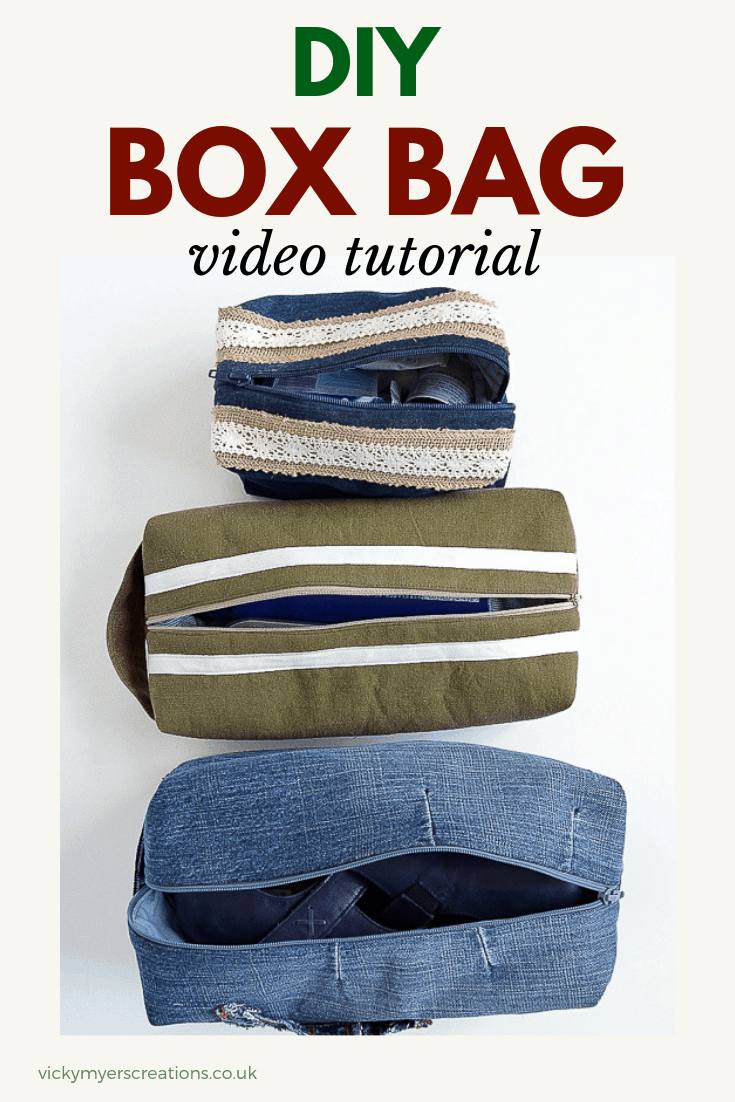

Today I am taking part in a #DIYBlogChallenge, the theme “Summer Festival”. Box bags are so versatile, great as toiletery bags, how about using them as craft projects, they are perfect for a crochet hook and your latest project.
Table Of Contents
- Video
- Fabric Choices
- Bag Sizes
- Materials
- Step By Step Instructions
- How to add a carry handle, optional
- Alternative pattern piece sizes for different size pouches
- Frequently Asked Questions
- Printable Instructions
Video
I have created a video to show you how to make the bag, or alternatively, follow the written instructions below.
Fabric Choices
I love working with old jeans so I have chosen to work with denim, alternatively, home decor fabric makes a great fabric choice.
When choosing your jeans to transform pick a pair that has straight seams, as this will be much easier to sew up (unless you have some super wide jeans where you will not have to include a leg seam!).
The fusible fleece adds shape to the bag but also stops the denim from stretching as you sew it. The finished bag measures 11″ long, 5 1/2″” wide and 5″ high. I also provide exact dimensions for smaller versions.
Bag Sizes
The large size zipper pouch pattern is shown in the free tutorial below.
Here are the finished measurements for the three different boxy zipper pouches:-
- Large denim bag measures 11″ long, 5 1/2″ wide and 5″ high
- Medium box bag fabric finished bag measures 9″ long, 5″ wide, and 41/2 high
- Small denim bag fabric, the finished bag measures 7″ long, 4″ wide, and 4″ high

Are looking for further ideas for what to do with your old jeans? Check out my 25+ craft ideas for old jeans
Personally, I am rather passionate about bag making – if you are new to bag making I have the perfect Beginners Bag Making Course for you which covers so many essential skills for bag making, and includes many free bag tutorials.
Boxed Zipper Pouch Pattern
Materials for pouch bags
Measurements shown are for the larger size, see below for alternative sizes.
- Exterior Fabric (denim or fabric) Two pieces measuring 17 by 11″
- Fusible fleece Two pieces measuring 17 by 11″
- Lining fabric Two pieces measuring 17 by 11″
- Iron on heavy weight interfacing Two pieces measuring 17 by 11″
- 18″ zipper
- Waistband of jeans for strap
- Pocket for detail (this pocket measures from a child’s pair of jeans)
Top tip – your sewing machine may struggle to sew these layers of fabric. I suggest a brand new denim needle, plus when sewing the layers together towards the end of the instructions a walking foot. Changing to a new needle and the walking foot made all the difference to complete this project!! If you would like a Top Tips for Bag Making guide plus PDF bag patterns sign up to my newsletter.
All seam allowances are 5/8″.
Step by Step Instructions
Step 1 Prepare your pattern pieces, cutting out as above (you may find a rotary cutter useful). Iron the fusible fleece to the back of your exterior panels following the manufacturer’s instructions. Iron on fusible interfacing to the back of the lining pieces.
If you are adding a denim pocket, measure, pin and place it. This pocket measures and is placed 5″ in from one side 3″ down from the top edge (zipper edge). Machine stitch into place.

Step 2 Make a sandwich of your fabric pieces for your zipper – right side of lining facing, zipper then the wrong side of the outer fabric facing. Stitch along close to the zipper with a zipper foot. You may find zipper tape helpful to hold the fabrics in place whilst you machine stitch, a zipper foot is also very helpful.

Turn the fabric so the right sides are facing and press the seams. Top stitch the top edges so the lining fabric and exterior fabric will not get caught up in the zipper.
Repeat for the other side of the zipper.

Step 3 Fold the right sides of your exterior fabric together, and the right sides of your lining pieces together. Stitch the bottom seam of your exterior fabric together (the long raw edges you have just matched), this forms the bottom of the pouch. Repeat for the lining but leave a turning gap of several inches in the middle of the seam.

Step 4 Unzip the zip by three-quarters (don’t skip this step like I did in the video!).
Now, this is where it becomes complicated – fold the exterior bottom seam you have just stitched to the zipper and pin. Repeat with the lining bottom seam.

Step 5 Stitch from the folded edge of one piece of fabric towards the zipper, stopping an inch short of the zipper. Repeat for each piece of fabric, you are stitching eight seams.

Step 6 Mark a 2″ square in each corner of the fabric (there are eight), a quilters ruler is very useful.

Cut each marked square out. Fold the right sides of the fabric together, thus forming a boxed corner, then machine stitch. Repeat for all eight corners. Note if you wish to add a carry handle see How to add a carry handle before sewing exterior fabric boxed corners.

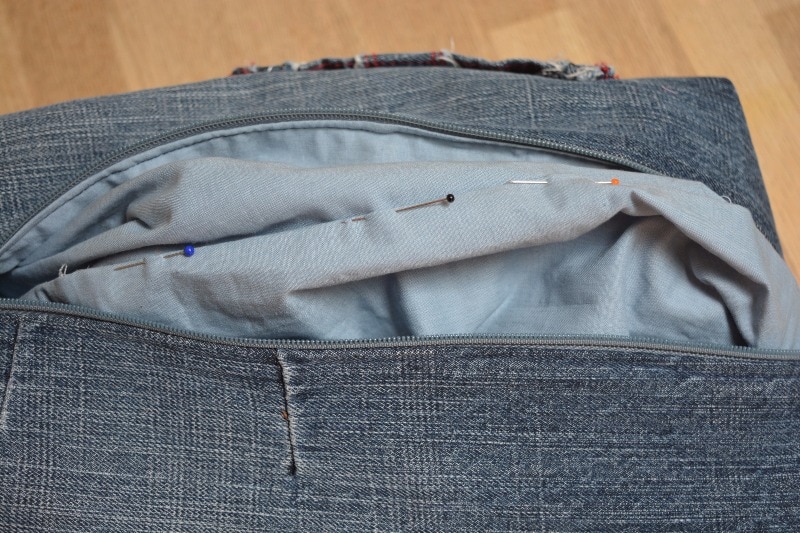
Step 7 Now we are going to finish the ends of the zipper. This is a little fiddly and a walking foot is useful due to the layers of fabric. Line the side seams up (the lining panels and exterior panels) – the ones you stopped short an inch before the zipper in step 5, so the raw edges align. Stitch along this seam joining the exterior fabric and lining fabric along the 2″ stretch not previously stitched, this attaches the lining and exterior fabric together.


Step 8 Turn the boxed bag right side out, pulling gently through the turning gap in the lining.

Step 9 Turn in the raw edges of your lining fabric along the turning gap. Either top stitch the straight seam to close or ladder stitch shut the folded edge gap in the lining. You can find a great tutorial here for ladder stitch.
How to add a carry handle, optional
To make a bag carry handle you will need a piece of fabric measuring:-
The width of the finished bag plus an inch, the width of the finished carry strap times two plus seam allowance.
I suggest 6 by 3″ for the larger bag, 5 1/2 by 2 1/2″ for the medium bag, 4 by 2 1/2″ for the smaller bag.
Place the long edges right sides facing and stitch your seam allowance.


Turn the tube right side out and press so the seam is centered on one side of the handle. Top stitch both sides of the handle.


Insert one end of the handle into one of the boxed corners of the exterior fabric, prior to sewing this at step 6. The centered seam shoudl dace the side seam.


Place the opposite end into the opposite exterior fabric corner (at the same end of the zipper0 and sew up.


Alternative Sizes – Pouch Pattern Pieces
Medium boxed pouch bag, the finished pouch measures 8″ long, 5″ wide, and 5″ high – Fabric pieces 14 by 10″, Zipper 14″, Measure corners at 1 3/4″ for boxing.
Small boxed pouch bag, the finished pouch measures 7″ long, 4″ wide and 4″ high – Fabric pieces 12 by 9″, Zipper 12″, Measure corners at 1 1/2″ for boxing.
To change the size of your pouch – consider the size of the boxing as this changes the height of the bag and therefore the width. The bigger the corner cut out the higher the bag.

Frequently Asked Questions
How does my domestic sewing machine cope with the layers of fabric?
Pick a suitable new sewing machine needle such as a denim needle, microtex or a size 90 or larger. If you have one use a walking foot for step 7. If your sewing machine is skipping stitches check out my fix it guide.
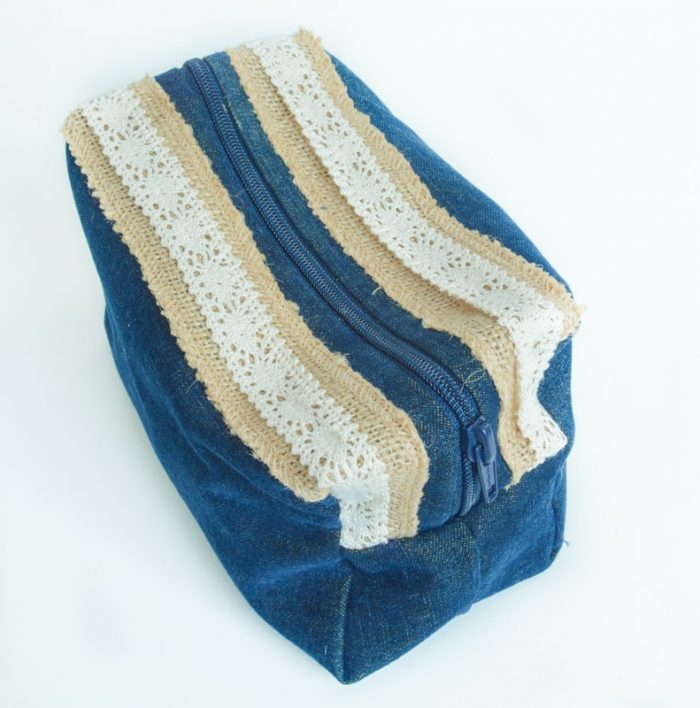
How do you customize the zipper pouch with lace/trim as shown in the pictured boxed zipper pouch?
After you have cut out your pattern pieces, place the desired trim parallel to the top edge, when calculating the position do not forget the seam allowance of 5/8″ – the lace/trim shown is attached to the exterior pattern pieces an inch from the top edge and stitched in place before proceeding with the next step.


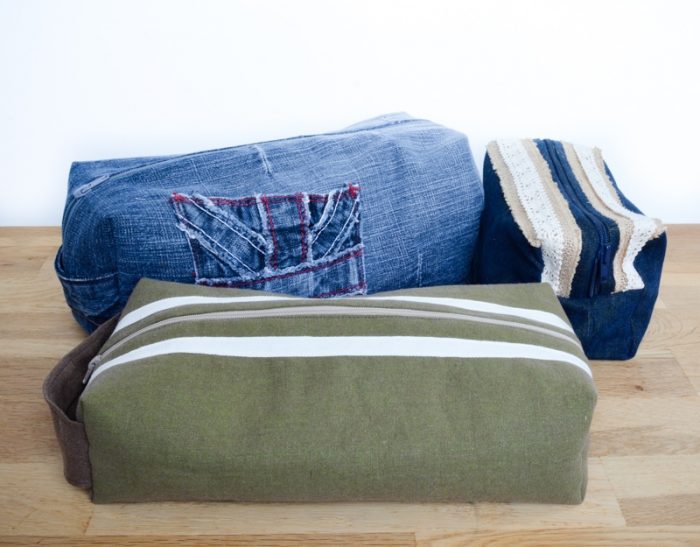
My small super cute denim bag is filled with our paired down first aid kit, perfect for taking to festivals, camping. The middle-sized boxed pouch bag (shared on the video) is perfect for a cosmetic bag, and the large box bag is great for craft projects! Somehow I don’t think I will be stopping at three box bags.
Boxy Zipper Pouch


Materials
- Exterior Fabric (denim or fabric) Two pieces measuring 17 by 11"
- Fusible fleece Two pieces measuring 17 by 11"
- Lining fabric Two pieces measuring 17 by 11"
- Iron on heavy weight interfacing Two pieces measuring 17 by 11"
- 18" zipper
Tools
- Zipper Foot
- Quilters Ruler
- Quilters Foot
- Scissors
- Sewing Machine
Instructions
- Prepare your pattern pieces. Iron the fusible fleece to the back of your exterior fabric and iron on the fusible interfacing to the back of the lining.
- Make a sandwich of your fabric pieces for your zipper - right side of lining facing, zipper then the wrong side of the outer fabric facing. Stitch along close to the zipper. Turn the fabric so the right sides are facing and press the seams. Top stitch the top edges so the lining fabric and exterior fabric will not get caught up in the zipper. Repeat for the other side of the zipper.
- Fold the right sides of your exterior fabric together, and the right sides of your lining pieces together. Stitch the bottom seam of your exterior fabric together (the long raw edges you have just matched), this forms the bottom of the pouch. Repeat for the lining but leave a turning gap of several inches in the middle of the seam.
- Unzip the zip by three-quarters. Fold the exterior bottom seam you have just stitched to the zipper and pin. Repeat with the lining bottom seam.
- Stitch from the folded edge of one piece of fabric towards the zipper, stopping an inch short of the zipper. Repeat for each piece of fabric, you are stitching eight seams.
- Mark a 2" square in each corner of the fabric (there are eight), a quilters ruler is very useful. Cut each marked square out. Fold the right sides of the fabric together, thus forming a boxed corner, then machine stitch. Repeat for all eight corners.
- Line the side seams up (the lining panels and exterior panels) - the ones you stopped short an inch before the zipper in step 5, so the raw edges align. Stitch along this seam joining the exterior fabric and lining fabric along the 2" stretch not previously stitched, this attaches the lining and exterior fabric together.
- Turn the boxed bag right side out, pulling gently through the turning gap in the lining.
- Turn in the raw edges of your lining fabric along the turning gap. Either top stitch the straight seam to close or ladder stitch shut the folded edge gap in the lining.
Notes
Alternative Sizes -
Medium boxed pouch bag, the finished pouch measures 8″ long, 5″ wide, and 5″ high – Fabric pieces 14 by 10″, Zipper 14″, Measure corners at 1 3/4″ for boxing.
Small boxed pouch bag, the finished pouch measures 7″ long, 4″ wide and 4″ high – Fabric pieces 12 by 9″, Zipper 12″, Measure corners at 1 1/2″ for boxing.
Why not check out my fellow #DIYBlogChallenge bloggers, and see their DIY creations on the theme of Summer festival:-

Soclikes
Monday 12th of October 2020
Thanks for this tutorial, it helped me a lot!
Another Joy
Tuesday 12th of February 2019
Thanks a ton! I was looking to save money on buying my 5 boys a personal care bag kit. This will be really helpful.
laya gaga
Wednesday 4th of April 2018
Brilliant work!!! Just amazing. Wonderful tutorial. I will try to make this today. Thanks for sharing this nice skill.
JOY
Wednesday 2nd of August 2017
Great idea for recycling jeans!
kate
Monday 17th of July 2017
I very love this. Thank for your post this is really helpful.