
Let me show you just how easy it is to make a foraging bag with detachable lining. This foraging bag pattern is fully lined and features a slip pocket. The adjustable fit strap allows a comfortable fit.
This foraging bag has a magnetic snap closure, the lining is inserted and attached with a zipper. I have added a slip pocket to the lining.


My incentive for making this bag is to forage for leaves, fresh cut flowers, in fact any foliage for gelli plate printing, the detachable lining is super easy to put through the washing machine in between walks.
Where possible I like to work with the materials I have to hand in this case denim and a splash of colour with cotton fabric scraps. Cotton canvas or waxed canvas would be ideal fabric to work with.


Personally I am rather passionate about bag making – if you are new to bag making I have the perfect Beginners Bag Making Course for you which covers so many essential skills for bag making, and includes many free bag tutorials.
Table of Contents
Materials for foraging bag
- Contrasting fabric 5 1/2 by 16 1/2″ (or contrasting fabric) (14 by 42cm)
- Outer bag fabric, two pieces 16 1/2″ by 15 1/2″ (42 by 39.5cm)
- Outer bag fabric facing 15 1/2″ by 4 1/2″ (39.5 by 11.5cm)
- 14″ Zip (35cm)
- Two pieces of Lining Fabric 15 1/2″ by 12 1/2″ (39.5 by 32cm)
- Lining fabric facing 15 1/2″ by 2″ (39.5 by 5cm)
- Internal slip pocket fabric 13″ by 5 1/2″ (33 by 14cm)
- Scissors
- Sewing machine
- Annies Soft and Stable 16″ by 15 1/2″ (41 by 39.5cm)
- Iron on interfacing 15 1/2″ by 12 1/2″ (39.5 by 32 cm)
- Webbing (for straps) 2 yards (1.75m)
- 2 D Rings
- Bag Slider
- Magnetic Snap
You Tube video
Foraging Bag with Detachable Lining
Let’s get started making your foraging bag. The finished bag measures 13″ high by 12″ wide by 2 1/2″ deep (33cm by 30.5cm by 6.5cm)
The seam allowance is 1/2″.
Step 1 – Assemble Outside of Foraging Bag
Optional Decoration – I have sewn a strip of quilting cotton in a variety of fun prints to add to the bottom of the bag. This is 5 1/2″ wide by 16″ (14 by 41cm).
To add your decorative fabric mark the stitch line, 1/2″ (1cm) along one long edge (if like me you need a guide for a straight stitch line!).
Place your decorative fabric 5″ up for the bottom edge of the bag right sides facing, machine stitch at 1/2″ from the edge.


Turn over the decorative fabric towards the bottom of the bag and press. Baste within the seam allowance or use some form of fabric glue to hold in place.


Repeat for the second side of the bag.
Place your two bag pieces right sides facing so the edge of the decorative fabrics align along the side seam and bast within the side seam (this is optional but I chose to do this additional step to help with my alignment.


Cut out your Annies soft and stable, spray fabric adhesive to the soft and stable, place glue side to the wrong side of the outer piece of fabric so the bottom edge and side seams align.


Note the photograph does not reflect the shorter Annies Soft and Stable as I realised this was necessary after I stitched the seams.
Hold the long edges with sewing clips then machine stitch the two side seams and the base of the bag together. You may find a walking foot and long sitch helpful due to the bulk of the fabric.
Step 2 Box the corners
To box the corner of the bag mark a 1″ (2.5cm) square in from the seam of each corner at the bottom of the bag.


Cut out the corner 1″ (2.5 cm) square from the stitched seam.


Fold the fabric so the raw edges are together, forming the base corner of the bag.


Machine stitch this raw edge, backstitching at each edge, thus finishing the boxed bottom of the bag.
Click here for a more detailed tutorial for boxing corners.
Step 3 Internal slip pocket
Iron interfacing to the wrong side of the bag lining pieces, following the manufacturer’s instructions. Now is the time to add any pockets, if you prefer you can skip this step.
Fold the pocket fabric in half, right sides together.


Stitch around two sides, trim the corners to reduce bulk, being careful not to cut the stitches.
Turn right side out then fold in the raw edge and press.


Place the pocket 2″ (5cm) down from the top of the right side of the lining and 5″ (12.7cm) in from the edge. Ensure your unstitched pocket edge is at the bottom of the pocket.


Stitch the three sides of the pocket, doubling your stitching at the top of the sides for strength. The stitching closes the turned in raw edges. Check out my detailed tutorial for how to make a slip pocket.
Step 4 Complete Bag Lining
Gather the second half of your opened ended zippers. Place so the zipper teeth are facing the bottom of the lining and the fabric of the zipper aligns with the top edge of the bag lining. Then add your lining facing, so the right side is facing the right side of the lining, and the edge aligns at the top.


Machine stitch across this top edge, then press open the lining and the facing.


Fold the facing over to the back of the lining fabric, then fold and press under the raw edge of the facing.


Machine stitch this second edge of the facing.
Repeat these steps for the second piece of bag lining.
Place the two sides of bag lining right sides together, machine stitch the sides and bottom of the lining. Finish the seam raw edges with a zigzag stitch to stop your removable lining fraying when washed.
Cut out the corners, 1″ (2.5cm) square as you did for the outer bag.


Fold the corners, stitch and finish the seam allowance with a zig zag stitch.
You have now completed your detachable bag lining.
Step 5 External Bag Facing
Finish the raw edge of the bottom of each piece, I have turned in the raw edge and zigzagged to secure.
Install the magnetic snap centrally on the two outer fabric facing pieces. Measure out the placement of the magnetic snap, place it centrally 1 3/4” (4.5cm) down from the top.


Place a 2″ (5cm) square of fusible fleece on the back. Place the metal washer in position and mark the rectangles.


Cut the markings, I like to use a seam ripper. Insert the snap, on the reverse place over the metal washer and fold the prongs outwards.
Iron a piece of fusible interfacing over the top, on the back. This will help prevent the magnetic snap tearing the fabric over time. Read a more detailed tutorial for inserting magnetic snaps.
Repeat for the second piece of bag facing so both sides of the magnetic snap are installed.
Place the two facings together and stich the side seams.


Now attach the open ended zipper


Step 6 Assemble the outer bag with facing
Cut two pieces of bag webbing 3″ each. Thread the D ring on and fold in half, placing raw edges to top edge of the bag, then baste in place on side seams.

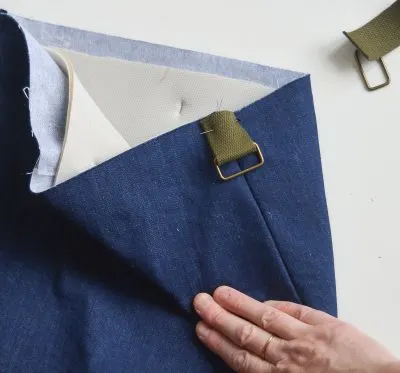
Place your outer bag facing on the outside of the bag, so the right sides of the facing and outer bag face each other and the side seams align. Pin together then machine stitch all around.


Folding the facing inside the bag and pin this top edge.


Topstitch all around the top edge of the bag. Due to the thickness of the Annies Soft and Stable it will help your sewing machine if you place a piece of spare Annies soft and stable parallel so your machine foot is even horizontally.
If your machine struggles with the layers of fabric I suggest a long stitch and travelling slowly.
Step 7 Add the adjustable strap
Now let’s add the adjustable shoulder strap to complete the foraging bag.
Thread your strap through the slider. Fold the end under, pin and stitch to secure. I like to stitch a rectangle with a diagonal cross.
Take the other end of the strap and thread it through one of your D rings. Thread from the back of the bag to the frontside with the wrong side upwards. Now thread the right side up through the strap slider.


Thread the strap from the front of the bag through the D ring, fold the raw edge under. Stitch to secure.
Lastly insert the detachable lining, by zipping the zippers together.


I hope you have enjoyed this free sewing pattern for the foraging bag with detachable lining. I have many free bag patterns and how to tutorials relating to bag making, do check them out.


Kitty
Monday 11th of August 2025
This is a very interesting bag. I'm thinking it will make a great project bag because of its interior pocket. With a little flap on the pocket, it will keep small items secure.