
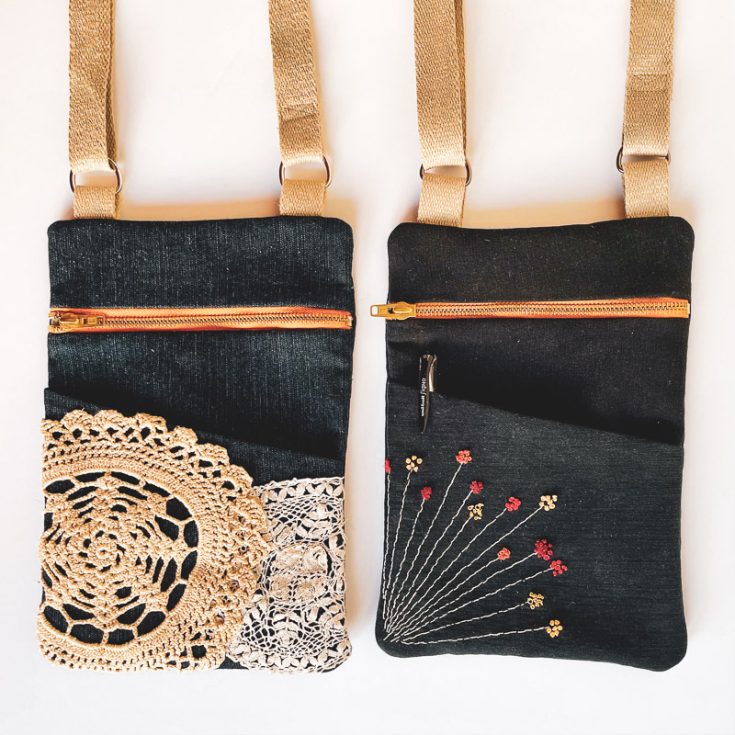
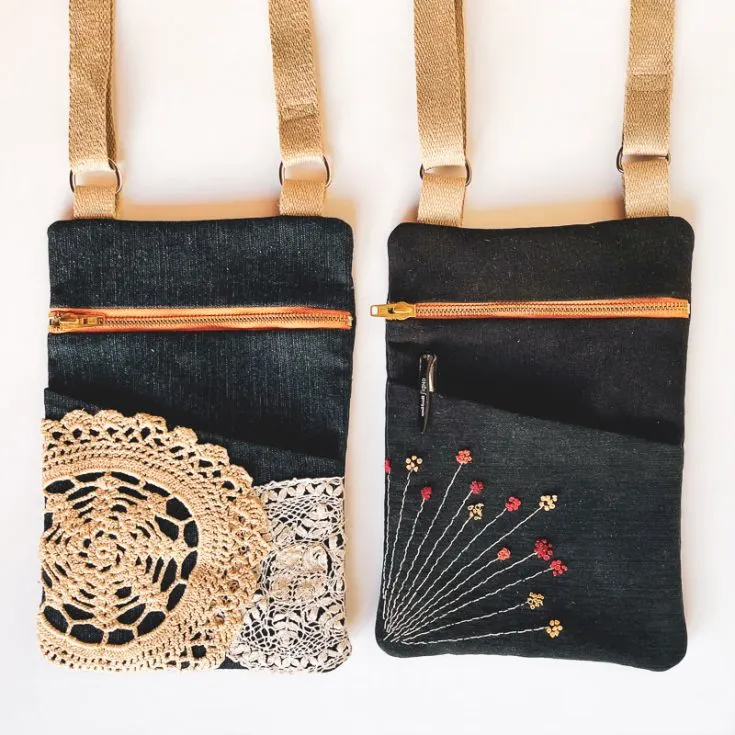
This upcycled free crossbody bag pattern has a zip closure with a slip pocket at the front.
You can customize this free crossbody bag pattern in a variety of ways. I like to embellish the slip pocket. In this version, I have used inherited crocheted doilies.
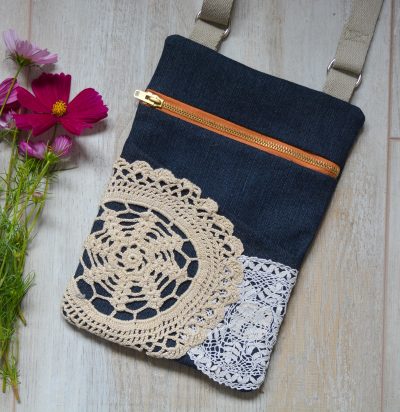

The finished cross-body bag measures 27 by 19cm (10 3/4 by 7 1/2″). The main compartment with zipper closure is the perfect size for a credit card and a cell phone with room left over for the rest of your possessions.
Check out my other free crossbody bag patterns
- Man’s messenger bag pattern
- Boro crossbody bag pattern
- Cork crossbody bag pattern
- Fabric crossbody bag pattern
Table of Contents
YouTube Video
You may wish to watch the video tutorial which accompanies the free crossbody bag pattern.
Materials
- A pair of jeans
- A zipper 20cm (8″) long
- A piece of an old sheet/shirt or fat quarter for lining the bag
- A piece of webbing 180cm (2 Yards) long and approx 2.5cm (1″) wide
- Two suitably sized D rings
- A slider
- Bias binding 2.5cm (1″) wide and 1m (1 Yard) long.
Cross Body Bag Pattern

Start by cutting out your pattern pieces, either simply measure out the straightforward pattern pieces yourself or sign up for the newsletter for downloadable pdf files in the resource library. You will need four per piece, one of denim, one of cotton for the lining, one of lightweight iron-on interfacing, and one of fusible fleece:
- 7cm by 21cm ( 2 3/4 by 8 1/4″)- Top front panel – this narrow piece goes above the zip
- 22 ½ by 21cm (8 3/4 by 8 1/4″- Bottom front panel – this piece goes below the zip
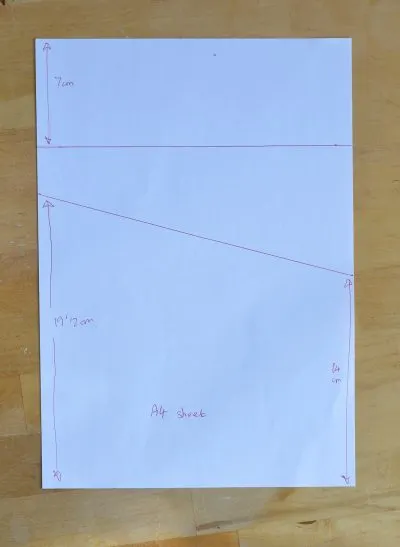
- One side 19cm high, width along bottom 21 cm, other side 14cm high (7 1/2 vy 8 1/4 by 5 1/2″) – Front angled slip pocket (see image)
- 29 ½ by 21cm (11 3/4 by 8 1/4|”) Back Panel of the bag


Step One – Prepare Pattern Pieces
Once you have cut out your fabric pieces iron the interfacing onto the back of the lining pieces. Trim the fusible fleece by 1/2cm all around – this is the seam allowance and reduces bulk when turning out the bag later. Iron the fusible fleece to the back of the denim.
Step Two – Front Slip Pocket
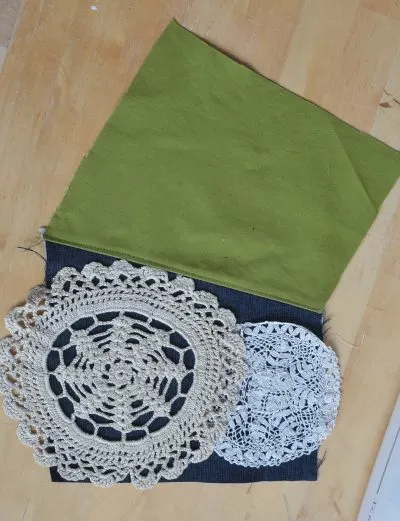
I am adding a couple of crocheted doilies onto the front angled slip pocket denim fabric as decoration. There are many ways to embroider fabric for bag making as an alternative suggestion.
Use small slip stitches to secure it in place, thread a needle with cotton sewing thread, and tie a knot on the long thread. Insert the needle from the wrong side of the denim and come up to the right side along the edge of your doily. Make tiny stitches, inserting your needle back through to the wrong side. Continue to secure the doily in place using as many stitches as required.


Place the right side of the slip pocket on the right side of your matching cotton lining. Stitch the top edge, the diagonal edge, with a 1/2cm (1/4″) seam allowance. Turn the right sides out and press the seam allowance towards the lining.
Understitch along the edge of the pocket lining. Under-stitching is a line of stitching visible on the pocket lining but not the front of the bag, it holds the seam allowance and lining together.

Fold and then press the pocket along the first seam, so that the wrong sides of the pocket face each other and set aside.
Step Three – Insert the Zipper
The next step is to insert the zipper. This is not as complicated as you may fear!
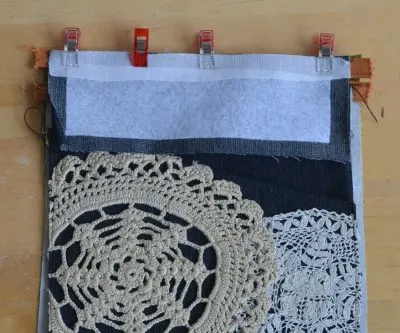
Place the lining fabric (bottom front panel) right side facing you, zipper right side facing you, then the wrong side of the denim outer fabric facing you so the top edges are all neatly aligned. Pin or tack and then machine stitch to secure. TIP – if your denim is stretchy add a thin strip of iron on interfacing above the fusible fleece as shown in the picture. This will stop the denim from stretching as you sew in the zipper.


If your machine will not stitch past the zip pull, insert the sewing machine needle into the fabric, lift the presser foot and wriggle the zip pull past the foot out of the way, lower your presser foot, and finish the seam.
Step Four – Complete the front outer bag pocket
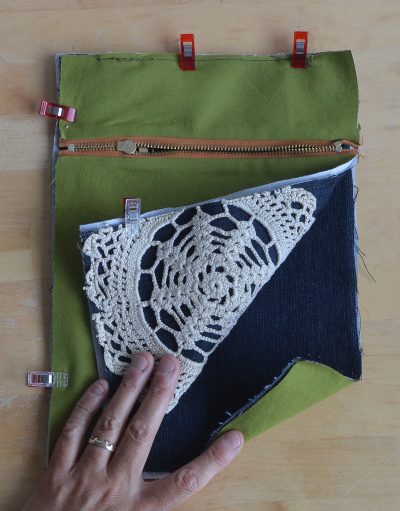
Now let’s baste the front slip pocket in place. Align the pocket so the side seams and bottom of the pocket and bag align. Baste in place then machine stitch using a zipper foot.
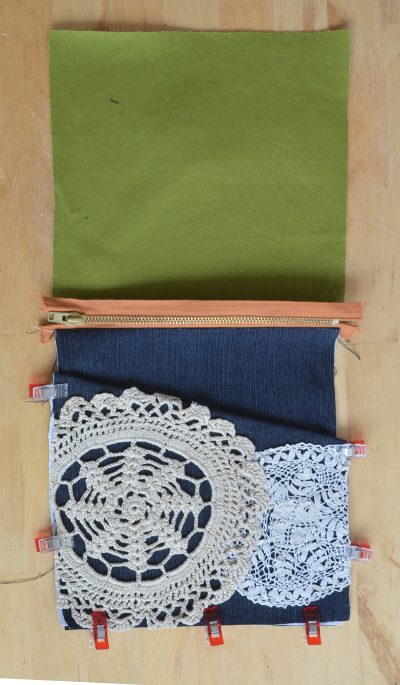

Let’s finish the front zipper pocket with the two narrow pieces of fabric (Top Front Panel). As before place the lining fabric right side facing you, zip right side facing you, then denim wrong side facing you. Machine stitch to secure.

So that’s the front of your outer crossbody bag complete.
Step Five – Add bag strap fastenings
Before we sew the bag up we need to create two loops for the D rings. Cut two pieces of webbing 6 cm (2 1/4″) long. Fold in half with a D ring threaded on. Place the two raw edges 2.5cm (1″) in from the side along the top of the bag and baste. Repeat at the other side so you have two D rings ready for your adjustable shoulder strap.


Step Six – Complete bag
Open the zip at least half way, this step is very important!
Place your back panel exterior fabric piece onto the front of the bag so the right sides face each other. Place the corresponding lining piece on top right side facing you, you now have four layers of fabric.

Machine stitch the four edges of the rectangle with a 1/2cm seam allowance.
Now let’s enclose the seam allowance with bias binding. Fold your bias binding in half and place either side of your seam allowance, encasing the raw edges of the seam. Machine stitch to secure.


Now insert your hand through the gap of the lining, through the zipper, and pull the denim bag right through. Ensure the corners of your denim are pushed out.
Step Seven – Attach the adjustable strap
Now let’s add the adjustable shoulder strap to complete the denim cross-body bag.
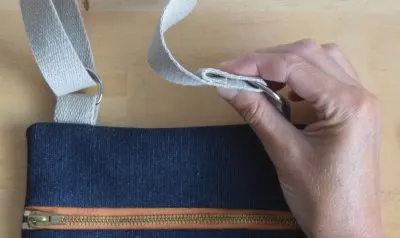
Thread your strap through the slider. Fold the end under, pin and stitch to secure. I like to stitch a rectangle with a diagonal cross.


Take the other end of the strap and thread it through one of your D rings. Thread from the back of the bag to the frontside with the wrong side upwards. Now thread the right side up through the strap slider.
Lastly, thread the strap from the front of the bag through the D ring, fold the raw edge under. Stitch to secure.

I hope you have enjoyed this free sewing pattern for the DIY crossbody bag.
Don’t forget, as a newsletter subscriber, you can download the free pdf pattern for this simple crossbody bag sewing pattern from the resource library.


Frequently Asked Questions
What types of fabric can I use for the crossbody purse?
Love the bag style but are not too keen on denim? You can’t go far wrong if you swap the fabric out for something of a similar weight such as a home decor fabric.
What length should the adjustable strap be?
Generally, the crossbody bag should fall on your hips, therefore the length of the shoulder strap varies due to varying heights. Making the bag with an adjustable strap means it should suit most heights. Some people recommend an 18-inch drop for women up to 5′ 2″, a drop of about 20 inches suits women up to 5′ 6.”, and for women 5′ 8″ or taller, a drop of 22 inches (a drop is the length of the strap folded in half). For reference, I am 6′ tall and always make the straps on patterns suitable for my height.
Will my regular sewing machine cope with layers of denim?
It should do with good quality thread, sharp denim sewing needles plus sewing slowly. Check out my youtube video for further hints and tips for sewing denim.
Printable PDF Free Crossbody Bag Pattern
Free Crossbody Bag Pattern
Step-by-step instructions for crossbody purse.
Materials
- Material list:
- A pair of jeans
- A zipper 20cm (8") long
- A piece of an old sheet/shirt or fat quarter for lining the bag
- A piece of webbing 180cm (2 Yards) long and approx 2.5cm (1") wide
- Two suitably sized D rings
- A strap slider
- Bias binding 2.5cm (1") wide and 1m (39") long.
Tools
- Zipper foot
- Denim Sewing Machine Needle
Instructions
- Cut out pattern pieces in exterior fabric, lining fabric, fusible fleece and iron on interfacing
- 7cm by 21cm ( 2 3/4 by 8 1/4")- Top front panel - this narrow piece goes above the zip
- 22 ½ by 21cm (8 3/4 by 8 1/4"- Bottom front panel - this piece goes below the zip
- One side 19cm high, width along bottom 21 cm, other side 14cm high (7 1/2 vy 8 1/4 by 5 1/2") - Front angled slip pocket (see image)
- 29 ½ by 21cm (11 3/4 by 8 1/4|") Back Panel of the bag
- Prepare pattern pieces. Iron the interfacing onto the back of the lining pieces. Trim the fusible fleece by 1/2cm all around – this is the seam allowance and reduces bulk when turning out the bag later. Iron the fusible fleece to the back of the denim.
- Front Slip Pocket. Add any decoration to the exterior fabric of front angled slip pocket. Place the right side of the slip pocket on the right side of your matching cotton lining. Stitch the top edge, the diagonal edge, with a 1/2cm (1/4") seam allowance. Turn the right sides out and press the seam allowance towards the lining. Understitch along the edge of the pocket lining. Under-stitching is a line of stitching visible on the pocket lining but not the front of the bag.
- Insert zipper. Place the lining fabric right sides facing you, zipper right side facing you, then the wrong side of the denim outer fabric facing (Bottom Front Panel) you so the top edges are all neatly aligned. Pin or tack and then machine stitch to secure.
- Complete the front outer bag pocket. Align the slip pocket (step 2) so the side seams and bottom of the pocket and bag align. Baste in place then machine stitch. As in step 3 place the lining fabric right side facing you, zipper right side facing you, then denim wrong side facing you (Top Front Panel). Machine stitch to secure.
- Bag strap fastenings. Before we sew the bag up we need to create two loops for the D rings. Cut two pieces of webbing 6 cm (2 1/4") long. Fold in half with a D ring threaded on. Place the two raw edges 2.5cm (1") in from the side along the top of the bag and baste. Repeat at the other side so you have two D rings ready for your adjustable shoulder strap.
- Complete bag. Open the zip at least half way, this step is very important! Place your back panel exterior fabric piece onto the front of the bag so the right sides face each other. Place the corresponding lining piece on top right side facing you, you now have four layers of fabric. Machine stitch the four edges of the rectangle with a 1/2cm seam allowance. Enclose the seam allowance with bias binding. Fold your bias binding in half and place either side of your seam allowance, encasing the raw edges of the seam. Machine stitch to secure. Pull the bag right side out through the open zipper.
- Attach the adjustable strap. Thread your strap through the slider. Fold the end under, pin and stitch to secure. Take the other end of the strap and thread it through one of your D rings. Thread from the back of the bag to the frontside with the wrong side upwards. Now thread the right side up through the strap slider. Lastly, thread the strap from the front of the bag through the D ring, fold the raw edge under. Stitch to secure.
I love bag making from old fabrics. I have many free bag patterns and tutorials to inspire you further.

