
I’m excited to share an easy embroidered patchwork pillow tutorial. This pattern is a fun one to make in a variety of color and fabric combinations.
There are some great benefits of making a patchwork pillow from using your favorite scraps to adding a splash of color to your home decor. This free pillow pattern can be made in any size, ready for your pillow inserts.


Materials for patchwork pillow cover
- Fabric scraps
- Scissors
- Sewing machine
- Thread
- Pins
- Ruler
- Rotary cutter
- Cutting mat
- Iron
- Pillow insert
- Embroidery Thread


Choosing fabrics for an embroidered patchwork pillow
Cotton fabrics are the best choice for your patchwork top. I am working with a bundle of fabrics purchased from Colette Moscrop with some plain linen to add mini borders around each print. You can pick up bundles of fabric prints from a variety of Etsy sellers.
Top tips for choosing the best patchwork cushion fabrics:
- You may like to try to include fabrics from a pre-loved item of clothing or vintage sheets.
- Stretch knits can be difficult to work with, personally, I avoid them. However, you can add iron-on interfacing to the back to prevent the stretch making them easier to work with
- Keep to the same weight of the fabric so the pillow top pieces together easily and holds its shape.
- Avoid heavy fabrics as they can be difficult to work with.
Preparing the Fabric
If you are working with preloved fabrics I strongly suggest washing and ironing them – there is nothing worse than finishing a project and noticing a stain on your fabrics!
I have to admit I am not a natural at precise seam allowances so I added a thin iron on interfacing to the back of my fabric just to add a touch more stability. This is entirely optional.
How to make a patchwork cushion
Step One – Patchwork design and layout
Lay out your printed fabric pieces in a pleasing design, you may wish to play around with different layouts and photograph them so you can compare and choose. Having a photograph of your chosen layout is very helpful as a visual reminder as you piece the fabric scraps together.
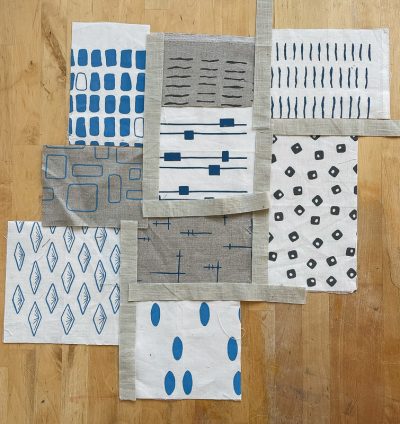
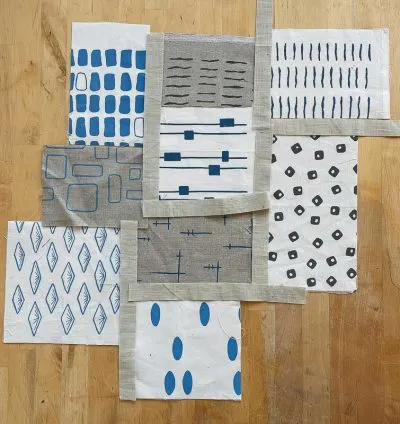
My design is joined by strips of neutral fabric which are cut at 1″ width, making a 1/2″ strip when sewn.
Step Two Joining fabric pieces
Join strips of fabric together, placing fabric right sides together then stitch with straight lines with a 1/4″ seam allowance.


Iron each seam allowance as you go as pressing the fabric gives a much more professional finish. Press the seam allowance open.
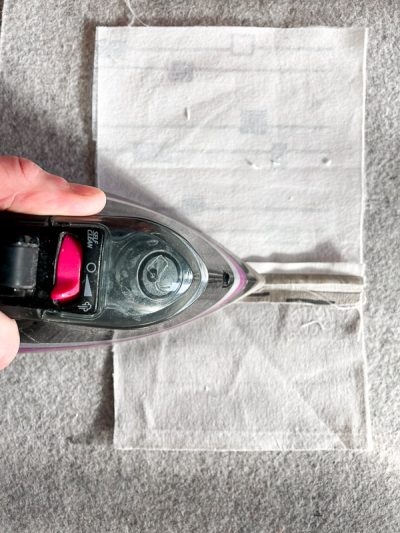

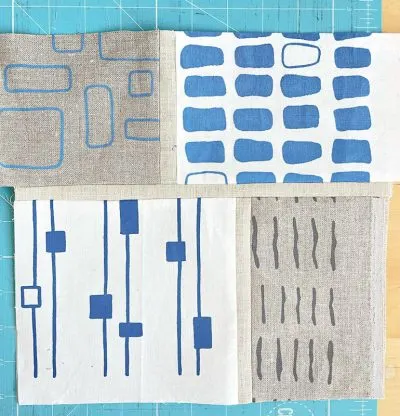
Trim the strips so you have parallel even edges. A rotary cutter, cutting matt, and quilters ruler are very helpful for this.


Build up strips of fabric until you have your completed pillow top.

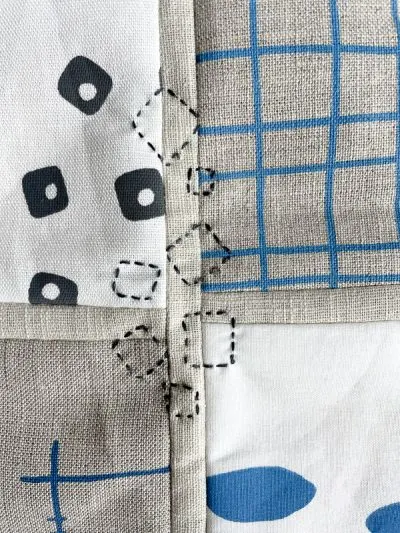
Step Three, Optional – Adding hand embroidery
Inspired by Collete Moscrop Instagram feed I have chosen to add hand embroidery to my patchwork cushion cover. A simple running stitch can add so much to your pillow cover. Embroidery silks are a great choice of thread for your free-style hand embroidery. Have fun playing with stitching.


I have created shapes inspired by the fabric prints.

Step Four, Optional – Quilting the Pillow Top


This is totally optional. If you wish to quilt your pillow top I suggest layering a backing, cotton batting, and your patchwork top, pinning, and then basting together. Using a walking foot machine stitch through your layers, alternatively, you can hand stitch.
Step Five Pillow back
Cut two pieces of rectangle pieces fabric 16″ by 11″ (for a 16″ square) or 18 by 12″ (for a 18″ square).
Turn over the hem edge by ⅜ inch (1cm) on the wrong side of one long edge and press. Press over again by the same amount to form a double-fold hem. Repeat for the second rectangle. Machine stitch to finish the hem.
Place the fabrics to form your square, with the fabrics overlapping. Baste the side edges where they overlap within the seam allowance.


Step Six Finishing the Square Pillow
Place the front and back pieces right sides facing. Machine stitch all around.
Trim the corners as this gives a neater corner.


Now finish the seam allowance with a zigzag stitch, overlocking, or trim the seam allowance with pinking shears.
Turn the patchwork pillow cover right side out, using a blunt object such as a chopstick push out the corners. Lastly, press the finished throw pillow cover and insert the pillow insert.


How to care for your embroidered patchwork pillow
To wash embroidered pillow covers turn them inside out. Place the cushion cover in the washing machine with a gentle detergent and cold water cycle. Dry on a line or lying flat, then press. When pressing I suggest placing a towel on your ironing board and laying the embroidery facing the towel. This stops the iron from pressing the embroidery flat.
How to make an easy patchwork pillow


Materials
- Fabric scraps
- Rectangles of fabric for cushion back
Tools
- Scissors
- Sewing machine
- Thread
- Pins
- Quilting Ruler
- Rotary cutter
- Cutting mat
- Iron
Instructions
- Prepare fabric pieces, cutting out rectangles and 1" wide strips of plain fabric
- Layout your fabric in various designs and photograph your desired design.
- Join strips of fabric together, placing fabric right sides together then stitch with straight lines with a 1/4" seam allowance.
- Press seam allowances open as you sew.
- Build up strips of fabric until you have your completed pillow top.
- Cut two pieces of rectangle pieces fabric 16" by 11" (for a 16" square) or 18 by 12" (for a 18" square).
- Turn over the hem edge by ⅜ inch (1cm) on the wrong side of one long edge and press. Press over again by the same amount to form a double-fold hem. Repeat for the second rectangle. Machine stitch to finish the hem.
- Place the fabrics to form your square, with the fabrics overlapping. Baste the side edges where they overlap within the seam allowance.
- Place the front and back cushion pieces right sides facing. Machine stitch all around.
- Trim the corners as this gives a neater corner. Now finish the seam allowance wither zigzagging, overlocking, or trim the seam allowance with pinking shears.
- Turn the patchwork pillow cover right side out, using a blunt object such as a chopstick push out the corners. Lastly, press the finished throw pillow cover and insert the pillow insert.
I have chosen to use an envelope closure for the patchwork pillow cover. If you love having a variety of pillow covers around your home check out my other tutorials:
- Autumn Leaf Pillow Cover
- Recycled Denim Pillow Cover
- Valentine Heart Pillow
- Embroidered Upcycled Sweater Cushion Cover
- Chevron Cushion Cover


Ann L
Wednesday 2nd of July 2025
This is lovely! And thank you for including printout instructions! And I have to add every craft item I've found that comes from a UK crafter is beautiful with well written instructions.