
Quilting denim is a fun and creative way to repurpose old jeans and create unique and durable quilts.
Making your own denim quilt from old denim jeans is very satisfying. Upcycled jeans make a heavy quilt, perfect for the winter months. This free denim quilt tutorial uses a quilt-as-you-go technique so you don’t need a long arm machine. The good news is that quilting denim for this quilt does not involve hand quilting!


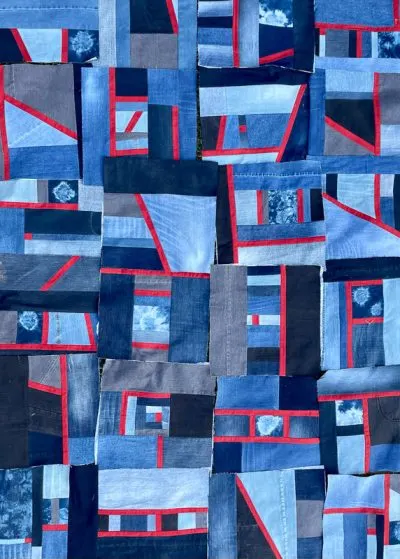
Not an extremely precise sewer? Don’t worry neither am I! My first denim quilt was a denim rag quilt, much as I love the original denim quilt it’s time to ring the changes. Quilting denim combined with a splash of strong contrasting orange linen has resulted in this stunning scrap denim quilt. Both are great denim quilt patterns for beginners.
You will notice some tie dyed denim in the quilt, learn how to tie dye old jeans.


Table of Contents


Sourcing Old Jeans
Gather pairs of old blue jeans from friends and family, the local thrift shop, yard sales or car boot sales. Think about the type of denim you are sourcing – look for denim that is not too heavy or thick, as it can be difficult to work with when quilting. Lighter-weight denim is easier to handle and sew.
It is also easier to sew nonstretch jeans, however, you can iron on iron on interfacing to the wrong side of stretchy denim to stabilize it. A wide pant leg provides more fabric but don’t rule out skinny jeans – all the old pairs of jeans add up. Personally, I like the wide range of tones of blue, grey, and black in my quilt.
Finished Quilt Size
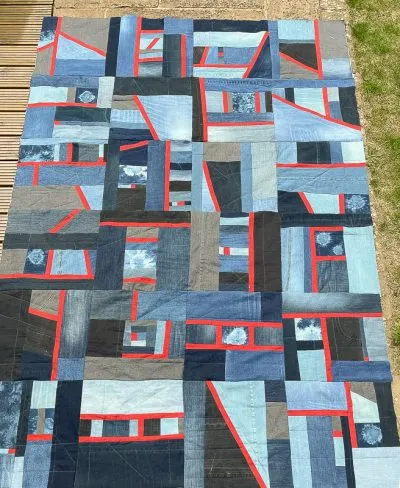
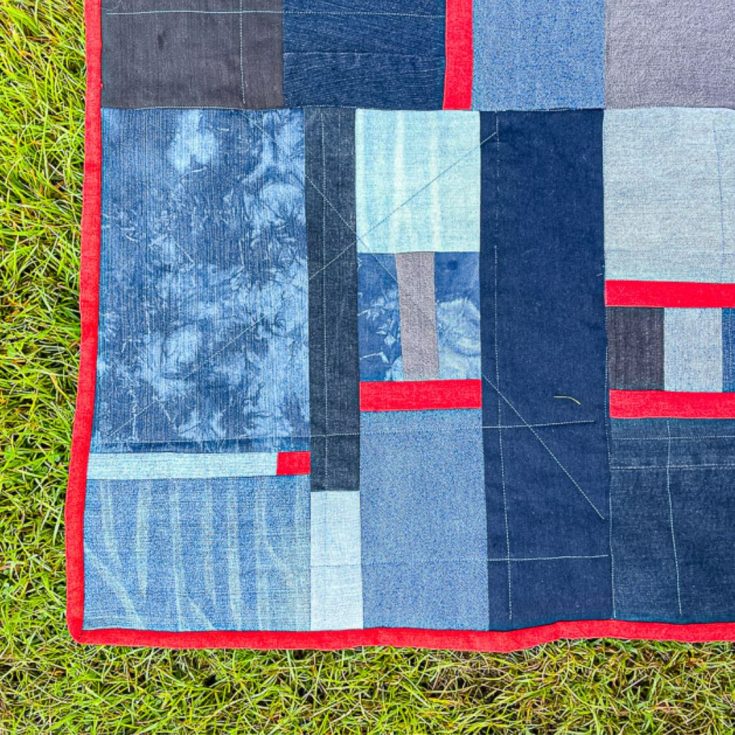
I have made this bed quilt for our two single beds we have pushed together, hence the rectangular finish. My finished blue jeans quilt measures 96 by 64″, made up with 24 denim blocks measuring 16″ each.
Standard quilt sizes for beds are:
UK quilt sizes
- Cot or crib quilt: 120x140xm (47x55in)
- Single quilt: 140x200cm (55x79in)
- Double quilt: 200x200cm (79x79in)
- King size quilt: 225x220cm (89x87in)
- Super King size quilt: 260x220cm (102x87in)
US quilt sizes
- Crib quilt: 36x54in (91x137cm)
- Twin quilt: 65x88in (165x224cm)
- Full/double quilt: 80x88in (203x224cm)
- Queen size quilt: 86x93in (218x246cm)
- King size quilt: 104x93in (264×236.22cm)
When deciding the size of your finished block do not forget to factor in seam allowances when it comes to sewing. Your backing and quilt block are the same size as each other, 1″ larger than your finished block, your batting is cut to the finished size of your block. This allows a 1/2″ seam allowance for joining the blocks.
How to Make a Denim Quilt
Materials for Quilting Denim
- Lots of old jeans
- Contrasting woven fabric
- Iron on interfacing
- Cotton Batting
- Quilt fabric or old duvet cover
- Denim Needles, I suggest size 16 or 18’s
- Cotton Thread
- Sewing Machine
- Quilting Foot
- Quilting ruler
- Rotary cutter
- Cutting Matt
- Safety pins or spray fabric adhesive
How to make scrap denim quilt blocks
Let’s start with good old-fashioned preparation. Give your denim a good wash in your washing machine – you don’t want to spend hours on your quilt and then find you can’t remove any stains from the old jeans!
If your old jeans are made from a stretch denim use iron on interfacing on the back to stabilise them before cutting out your quilt pieces, or add strips of iron on interfacing along the seam allowance of any pieces.
Using quality cotton thread and a new denim needle thread your sewing machine.
If you wish to tie dye some of your old jeans check out my you tube video How to Tie Dye
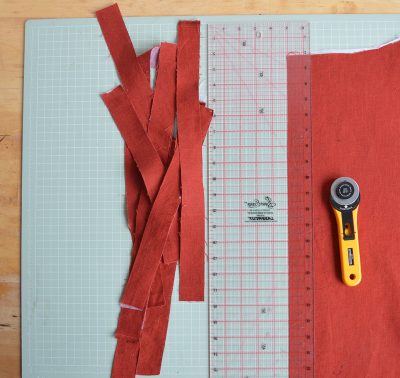
Cut strips of your contrasting fabric 1 1/2″ wide and at least 1″ long than the size of your finished blocks. Consider the weight of your contrasting fabric, I am working with scrap linen so have added iron-on interfacing to the wrong side, which makes the linen fabric closer in fabric weight to the denim.

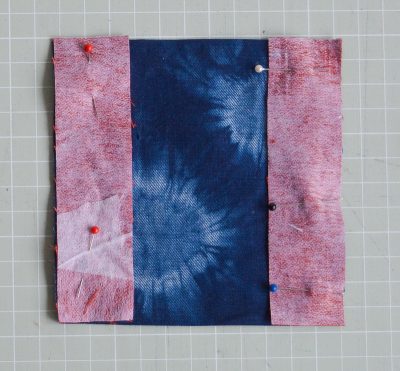
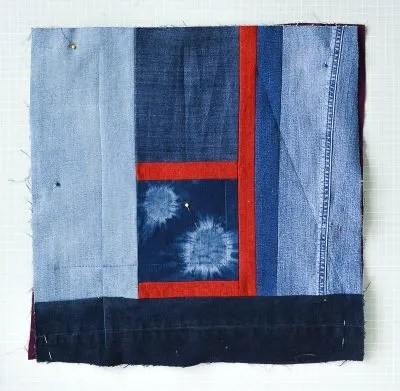
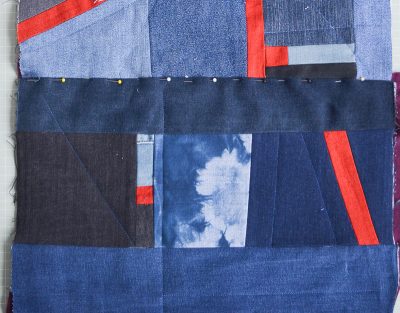
Start playing with fabric scraps, with straight cut edges. For this block I have started with a piece of tie dyed denim, cut as a square. Visit my denim heart pencil case tutorial for tie dying denim instructions.


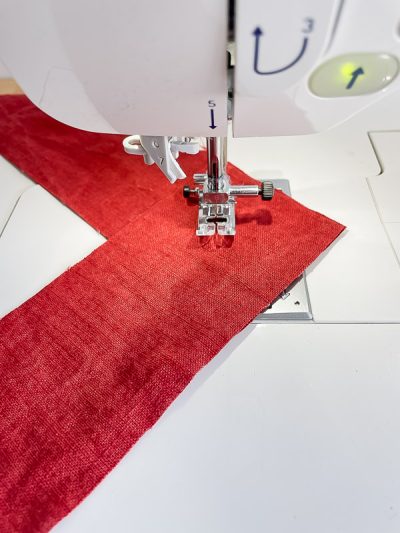
Next I placed two strips either side of the square with contrasting fabric. Place the fabric’s right sides facing each other and stitch with a 1/4″ seam allowance.

Press the seam allowance open carefully, like with any quilting project. Pressing is particularly important when working with denim, use a hot iron and press seams flat to avoid bulky areas in your quilt.
Play with different shapes and tones of denim for your composition.
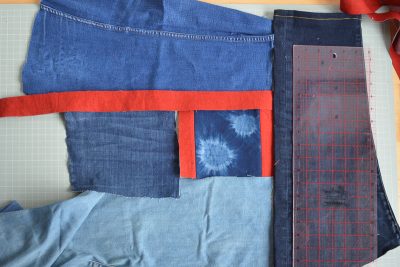

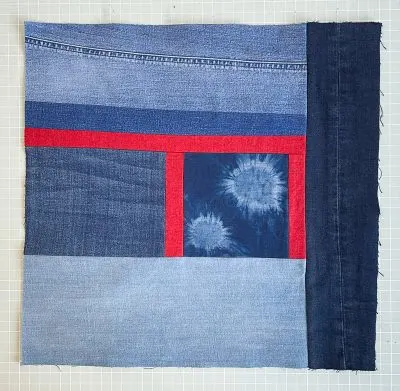
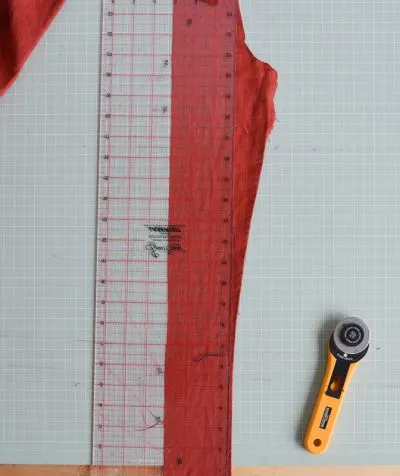
Once you are happy with your layout cut out your denim shapes, remembering to include your seam allowance. Gradually piece your denim block together, ironing as you go. Ensure you allow a seam allowance for joining your blocks, I have added an extra inch. The blocks are sewn as 17″ but when the quilt is assembled they are 16″.


This scrap denim quilt is improvised as I go, feel free to draw inspiration for your shapes from traditional blocks.

How to join blocks and quilt as you go
Let’s start with the quilt top layout – gather your square blocks and lay them out, playing around with placement until you are happy with the design. Quilting designs are personal, it’s a great idea to photograph different layouts and compare them.

For the denim quilt backing I am using cotton fabric, an old duvet cover, with cotton batting.
Cut out your batting an inch smaller than your blocks, in my case measuring 16″. Cut out the backing to the same size as your blocks, in my case 17″.
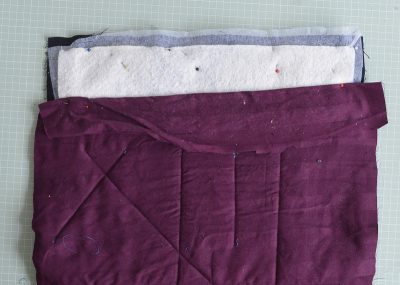
Make a quilt sandwich, back of the fabric – the wrong side facing you, batting placed centrally then the top block right side facing you, with the raw edges aligned with the back piece. Use safety pins or pins to hold the layers together or you could use a temporary fabric adhesive.


Quilt through the three layers with random lines, stopping a 1/4″ in from the edge of the batting. You could make yourself a cardboard template and draw around it with quilters chalk to make sure you stop 1/4″ before the edge of the sandwiched batting.

Continue quilting denim until you have quilted all blocks.
Note – When quilting denim a walking foot is helpful due to sewing through multiple layers of denim, as it helps prevent shifting and puckering.
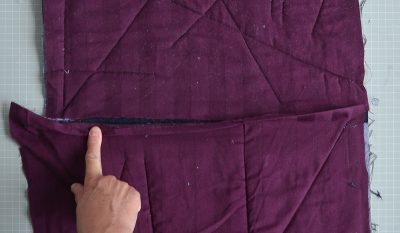
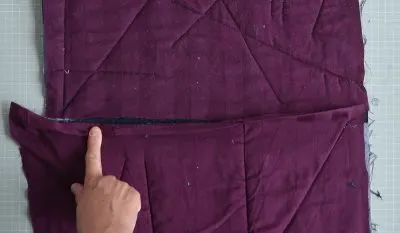
Now for joining up your denim quilt blocks… fold the back fabric and edge of batting away from the edge of the block and pin out of the way.
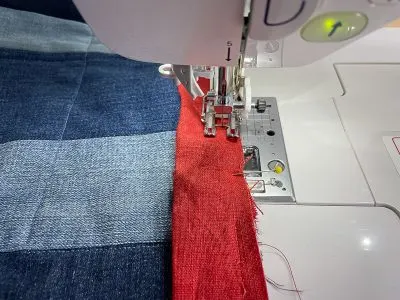
Place a second block on top so the right edges face each other, with batting and back fabric folded out of the way. Machine stitch with a 1/2″ seam allowance (this should be where your batting finishes).

Press the seam allowance open to reduce bulk and remove the pins. Place one piece of the back fabric down, now turn under the edge from the second piece with a seam allowance. Press well.
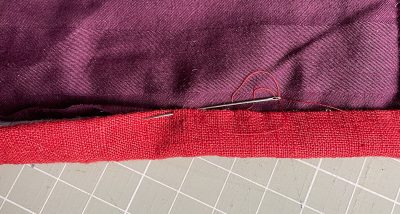
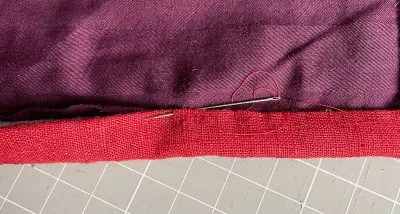
Turn the two blocks over and stitch in the ditch, catching the pressed fold of the backing fabric.

If you are hesitant about catching the back fabric you can hand baste in place first, or hand stitch the back join. Personally, I have chosen to hand-baste in place before machine stitching. You can read more about the different quilt-as-you-go techniques on Kristen’s fabulous blog.
Keep going until you have one strip of blocks. Repeat for the second strip of blocks, then using the same method join the two strips together. Continue until your quilt is assembled.

How to bind your denim quilt
Measure the edges of your denim quilt. Cut binding 3″ wide and as long as the combined edges of your quilt plus an additional 10″ for good measure.

I expect you will need to join strips together to achieve the desired length. Place two strips at right angles, stitch on the diagonal then trim the seam allowance and press open.

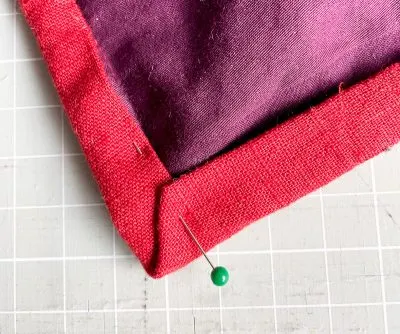
Fold the binding in half so the right side is facing and press. Fold in 1/4″ of one raw edge. Place the binding so the raw edges align with the edge of the quilt. Sew with a 1/4″ seam allowance, stopping 1/4″ before the edge, at the corner.

At the corner fold the fabric and start 1/4″ in from the edge at the corner.


Continue all around the quilt, once you reach the beginning, tuck your edging inside the folded raw edge and complete.


Turn the folded edge of the edging over, encasing the raw edge of the quilt. Hand stitch or stitch in the ditch.
At the corners fold the fabric to create a v shape and stitch.

I hope you love your denim quilt as much as I love mine! If you are not ready to start sewing now Pin for later.
Frequently asked questions
Will my regular sewing machine cope with layers of denim? It should do with good quality thread, sharp denim sewing needles plus sewing slowly. Check out my you tube video for further hints and tips for sewing denim.
What stitch length should I use? When sewing the quilt blocks I recommend a stitch length of 2.2, as this helps prevent the stitches from coming undone as you trim pieces to size.
Can I add embellishments to the quilt top? Denim can be embellished with embroidery, applique, or other decorative techniques. As you can see I have incorporated tie-dye denim in the quilt. Consider adding these elements to your quilt for added interest and texture before you join the blocks together.
What should I consider when binding a denim quilt? Think carefully about the weight of the fabric, it would be very hard to miter a corner with denim!
Overall, quilting denim can be a fun and rewarding way to create a one-of-a-kind quilt that is both durable and stylish. Experiment with different design and embellishment options to see what works best for you.
Its no understatement to say I love working with old jeans – do check out my denim projects for further inspiration.
How to make a denim quilt

Quilting denim is a great use for your old jeans.
Materials
- Lots of old jeans
- Contrasting woven fabric
- Iron on interfacing
- Cotton Batting
- Quilt fabric or old duvet cover
Tools
- Cotton Thread
- Sewing Machine
- Quilting Foot
- Quilting ruler
- Rotary cutter
- Cutting Matt
- Safety pins or spray fabric adhesive
- Denim Needles, I suggest size 16 or 18's
- Iron
Instructions
- Cut strips of your contrasting fabric 1 1/2" wide
- Play with denim pieces, with straight cut edges to compose the design of your block
- Starting with the center of your block place the fabric of your first two pieces of fabric right sides facing each other and stitch with a 1/4" seam allowance. Press the seam allowance open.
- Continue adding pieces of denim intermixed with contrasting strips of fabric, pressing the seam allowance as you go.
- Once your block is larger than your finished block size by an inch trim to a square - for example, my finished quilt blocks are 16" square so my finished piece is 17". This allows for seam allowance to join the finished blocks together,
- Sew all the blocks required for your finished quilt.
- Cut out your batting an inch smaller than your blocks, in my case measuring 16". Cut out the backing to the same size as your blocks, in my case 17".
- Make a quilt sandwich, back of the fabric – the wrong side facing you, batting placed centrally then the top block right side facing you, with the raw edges aligned with the back piece.
- Quilt through the three layers with random lines, stopping a 1/4″ in from the edge of the batting.
- Join up your denim quilt blocks. Place two blocks so the right edges face each other, fold the batting and back fabric out of the way and hold with pins. Machine stitch with a 1/2" seam allowance (this should be where your batting finishes).
- Press the seam allowance open to reduce bulk and remove the pins. Place one piece of the back fabric down, now turn under the edge from the second piece with a seam allowance. Press well.
- Turn the two blocks over and stitch in the ditch, catching the pressed fold of the backing fabric.
- Repeat until all blocks are joined together.
- Cut binding 3" wide and as long as the combined edges of your quilt plus an additional 10" for good measure.
- Fold in half and press.
- Place the raw edge along the edge of the quilt, right sides facing each other.
- Machine stitch with a 1/4" seam allowance.
- Stop a 1/4" away from the corner of the quilt.
- Fold the binding at 90 degrees and restart stitch a 1/4" in from the edge. Continue until al the quilt is edged.
- Turn over the quilt edging and either hand stitch or machine stitch, stitching in the ditch on the right side to finish your beautiful denim quilt.
Notes
Choose the size of your finished denim block, sew the block front one inch wider to allow for seam allowance.


IdahoCharlie
Friday 24th of November 2023
Please post a picture of the back! I’m going to try this method using denim for both sides to frame a paper piecing project. I’d love to see the rest of your project and really like the scrappy denim look! Thank you!