
Gelli plate printing is such fun with so many creative options, I lost myself for several hours having a play. Enjoy making gelli plate Christmas cards this holiday season.
The possibilities with gelli plate printing is totally endless. I give you fair warning once you get started you won’t want to stop!!! This blog post is photography heavy for which I make no apologies, I wish to spark your creativity!


With gelli plate printing you can build up layers of colors, and add texture, shapes, and stencils.
Table of Contents
What paper do you use with Gelli plate?
You can use any paper which will take acrylic paint, from printer paper to old sheets of music, to tracing paper, to white cardstock, to amazon packing paper. These all make great background papers.
How to print with a Gelli Plate
Let’s start by placing small amounts of acrylic paint onto your gelli plate, then rolling it out. You don’t need to start with much ink as you can easily add more. Ensure the plate is evenly covered.


To take a print lay a piece of paper over the top and press down, it’s that easy!! That’s your first print, if there remains excess ink on your plate you can take a second print.


Texture
There are so many ways to add texture to your plate, my favorite is placing a crumpled-up plastic bag across the ink, removing and then taking a print.


Have a look around your home, what can you use? Personally, I love kitchen roll which gives tiny dots, to bubble wrap.


Pressing an object onto the plate removes ink. I love circles, so I tried using the end of corks, cotton reels and even batteries to create random circular patterns. You could experiment with cookie cutters for larger shapes.


Stencils
You can use bought stencils, make your own or use objects as a stencil. Ink your gelli plate then place the stencil onto the plate before adding your printing paper. Wherever there are gaps in the stencil the ink will print onto your paper.


If you can have mini crafting cutters you could cut out lots of mini stars and place them across the plate, or you could try paper or crocheted doilies (be aware the ink won’t come off the crocheted doily).


I had fun experimenting, taking circles off with a cork then adding fine string across the plate. I found that when I used objects such as string in the plate the resulting print had a thicker line than anticipated, I personally preferred the prints I made with sewing thread rather than yarn.


Drawing
The gelli plate is soft so was a little concerned about damaging the plate, but I could not resist trying drawing onto the plate as a mark making technique. I used a yarn needle with the blunt end to mini random stitches across the plate, working quickly so the ink didn’t dry.


Not happy with your print? Use it as the base for building up layers of paint.
Another mark-making technique to try is cutting into cardboard and using like a comb to draw across the surface.
Layers of paint.
Some of my favorite prints are formed when I have a thin base layer left from the previous print, then I add a different color range, before removing some of the ink with a plastic bag. This reveals some of the first color left from the previous print.


Other options include allowing your first print to dry then printing the same paper a second time. This can give some interesting effects.
I feel like I have given you a whistle-stop tour of some of the possibilities with Gelli plate printing. If you would like further ideas do check out my How to start gelli printing post. Personally, I have loved doing something totally different, I found it a freeing activity that totally absorbed all my concentration.
Quick and Easy Gelli Plate Christmas Cards
Let’s think about shapes and designs for your gelli plate Christmas cards. I have played with simple triangles, stars, Christmas trees and circles as baubles. You can use cookie cutters as templates, or make some out of cardboard. Layer up your designs and adhere with a glue stick or PVA glue.
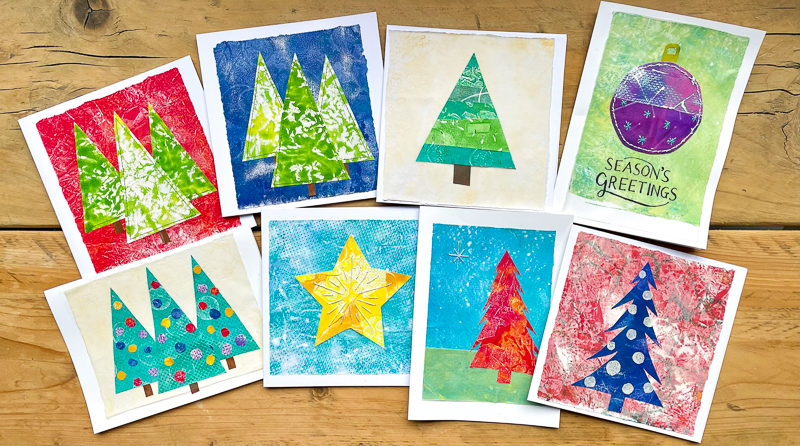

I have used tracing paper as a background, with light prints – often with a texture created with kitchen roll. On some designs, I have layered a second piece of tracing paper to represent the ground.


You can embellish the paper with hand embroidery, simple running stitches can form stars, and emphasize the bauble shape. As any stitch holes will always be a hole in paper I tend to insert my needle from the front for all the holes before then stitching back through these holes.


Or emphasize the shapes of Christmas trees with machine stitching.


With prints, you may not be quite as keen on individually, rip into small pieces and decoupage onto plain paper, cut out your shape and then add stitches. This star Gelli print Christmas Card is a combination of five different yellow prints.


Or cut strips and layer next to each on a base paper before cutting out Christmas tree shapes. No Gelli prints go to waste in this house!


My favorite gelli print christmas card so far is this one.


Wondering what to make with gelli plate prints?
Here are a few great ideas to get you started:-
- Art journaling, prints are a great way of journalling
- Stationery sets – you can imagine how beautiful it would be to receive a letter in a printed envelope with matching print along the top and bottom of the writing paper.
- Gift tags – it has to be said during the Christmas season!!!
- Handmade cards – I have to admit these are my go to, without trying to sound like a stuck record the possibilities are endless.
- Paper decorations – paper heart garlands are a great place to start
- Home decor – from paper chains to hanging decorations.
- Beads – paper beads are great fun to make.
- Origami papers – imagine printing your own.
You may wish to check out my previous DIY Christmas Card designs and the year I made Christmas Cards from cereal boxes.

