
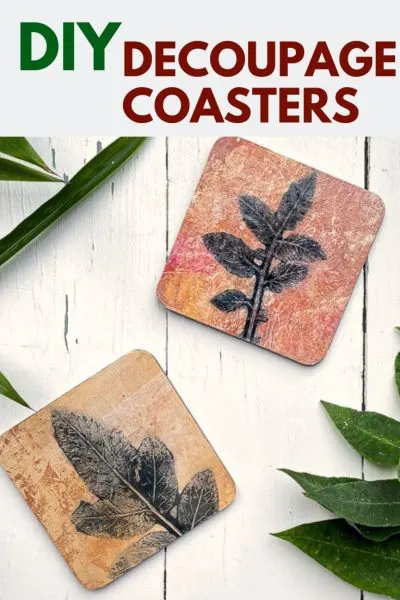
This easy decoupage coasters tutorial will show you the perfect way to make great coasters. DIY coasters make great gifts for family members and friends.
Coasters are an essential part of any home, protecting your furniture from unsightly water rings and adding a touch of style to your space. While you can easily purchase coasters at the store, there’s something special about creating your own custom coasters through the art of decoupage.

Decoupage is the art of decorating objects with paper cutouts or decorative napkins and sealing them with glue and a protective finish. It’s a versatile technique that allows you to transform everyday items into personalized pieces of art.
I will guide you through the process of making your own decoupage coasters and answer some frequently asked questions to help you get started.
Table of Contents
YouTube Video Tutorial for DIY Coasters
DIY Decoupage Coasters
Materials for your decoupage coasters
- Plain coasters or another suitable base (ceramic tiles, cork or MDF)
- Decorative paper (paper napkin, scrapbook paper, magazine cutouts or gelli plate prints)
- Decoupage glue or regular Mod Podge
- Foam brush or paint brush
- Clear acrylic sealer or varnish
- Sharp craft knife
Step 1 Prepare the Coaster
The first step is to ensure our chosen base for your coasters are clean and dry. If you are choosing to repurpose existing coasters it is super important to ensure they have no grease residue on surface of the coaster. I am choosing to work with cheap coasters bought from a dollar store.
Step 2 – Choose the Right Paper
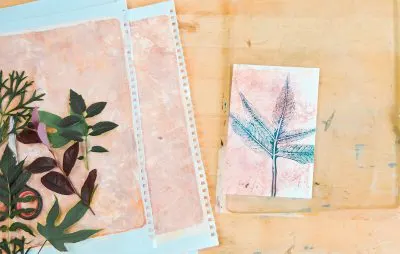
Choose paper that matches your decor or personal style. Cute napkins with beautiful patterns or unique designs work well. You can also experiment with photos, maps, or artwork. I am choosing to work with leaf gelli plate prints, perfect for my autumn home decor.
Cut out your chosen design from the paper. As I am using my own prints I have a create a cardboard cut out of the coaster to help me choose the section of print I wish to use.


Step 3 – Apply the Paper
Apply a thin layer of mod podge or decoupage glue to the coaster’s surface, place the paper cut out your chosen design from the paper. If you are using your own prints it is a good idea to create a cardboard cut out of the coaster to help me choose the section of print you wish to use.
Trim any excess paper from the coaster with a sharp craft knife.


Step 4 – Seal the Coaster
To ensure durability, apply multiple layers of mod podge or decoupage glue. Allow each layer to dry completely before adding the next. Typically, 2-3 coats of mod podge are sufficient.


Step 5 – Heat Resistance
To finish your coaster add a layer of clear varnish or resin to make it heat resistant.
Gelli Plate Leaf Prints
Not heard of gelli plate printing before? Its my new to me craft, and I love it – be warned its addictive. Here’s a detailed how to gelli plate print tutorial for you.

Background Paper
First lets prep the background of the papers. These are built up with layer of acrylic paint brayered onto a gelli plate.
Apply a very thin layer of paint to the gelli plate.


Remove some of the ink by applying a crumpled sheet of tissue paper, rubbing all over then peel off. Allow this first layer of acrylic to dry on your gelli plate.

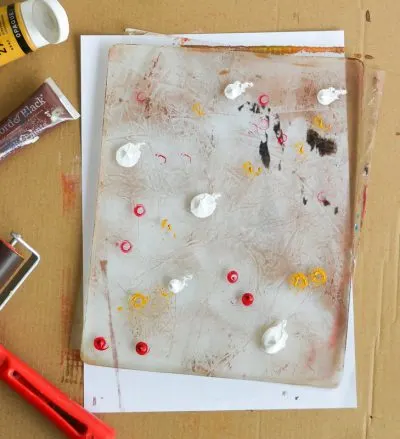
Add a second coat of acrylic ink, then pull a print. This should give you an interesting textured background.


Leaf Print
Apply dark acrylic paint to the plate, I have used a mix of brown, black and titanium blue. Place a leaf on your plate.


Using waste paper take a print to remove the surrounding ink.


This leaves you with the leaf design.


Quickly apply your base paper to the gelli plate and pull the leaf print.


If you are using gelli plate prints for your decoupage coasters set the prints aside to dry for 24hrs. The acrylic needs to be fully dry when you apply your mod podge when you make the coasters otherwise it will smudge.,
Frequently Asked Questions
How Long Does it Take for Decoupage Coasters to Dry Completely?
The drying time depends on factors like humidity and the number of layers. On average, it can take anywhere from 24 to 72 hours for the coasters to fully cure.
Are Decoupage Coasters Waterproof?
While decoupage coasters are water-resistant, they may not be completely waterproof. To protect them from moisture and spills, use a waterproof sealer or add a layer of resin on top.
If you are inspired by gelli printing check out my 25 great projects for gelli prints.

