
There are several ways to make tops fitted, from removing the sleeve, taking in the side seam then reattaching the sleeve, to taking in a little along the side seams to adding darts. Today I am going to share with you how to sew darts to create more shape and form for all those baggy tops in your wardrobe.
For years I have considered having a colours and style consultation re the clothes I wear. Recently I finally treated myself. A wonderful lady came to my home and we went through my entire wardrobe. We sorted into colours and styles that suit, clothes to sell or pass on and clothes to alter.
It’s amazing what a few safety pins did to show me how fitted tops accentuate the right part of my body. By the end of the two hours I had lots of tops with safety pins, all ready for me to add darts to!!


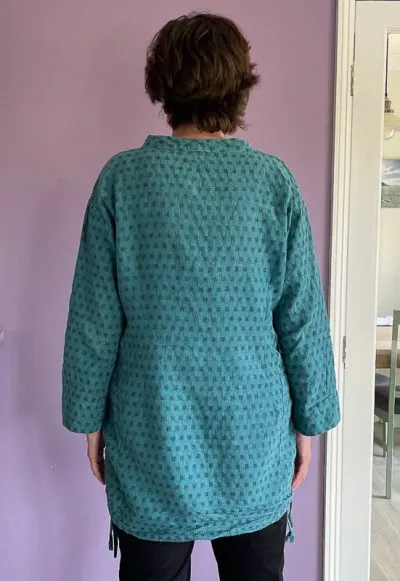
All my tops have been transformed by simply adding darts to the back of the tops, and for some additionally taking in a little of the side seam under my bust.
What is a dart?
A dart is sewn along a fold of the fabric, there are two common different types of darts sewn as either one line (frequently used as bust darts, or from the waist towards the hips of trousers) or as the long side of a diamond (frequently used on the back of shirts). This sewn line adds shape to a garment and is frequently used around the waist, bust and hips. It is a common fabric manipulation technique.
You may be familiar with how to sew darts from sewing patterns where a dart is marked on a pattern piece. It is easy to add darts to existing garments.
How to sew darts into your tops
Let’s start by putting the top on. Identify the thinnest place in your back, for myself this is below my bust line, for you it maybe closer to the waist.


Ideally ask someone else to gather the excess fabric into two pinches, at the thinnest area, or alternatively reach behind using both hands to gather the excess fabric into two pinches on either side of the center of your back.
Insert safety pins to hold these pinches of fabric, then take your top off. If it’s too tight to remove adjust the pinches! These safety pins represent the middle of the two vertical darts we are adding to the garment.


Using pins mark either side of the first dart so you can remove the safety pin.


Fold the top with the wrong side of the fabric facing you, down the middle of the proposed dart, so the two pins align. Ideally, following the grain of the fabric to your finished top will hang beautifully.
Mark out with tailors chalk half a diamond shape so you know where to sew your dart, with the widest point being where your pins are.

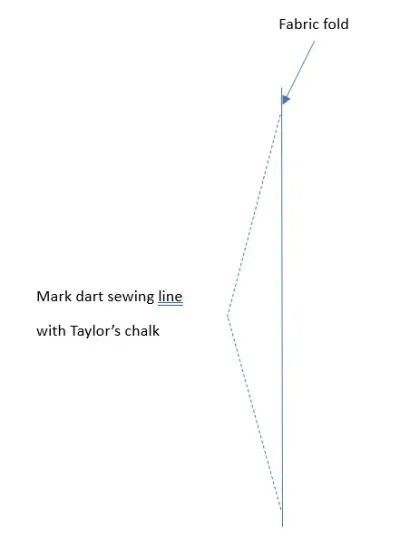
The length of the diamond, your dart line, will depend on your body shape and the amount of fabric you are taking in. As a general rule the more fabric in the dart the longer the diamond.


This can involve a little trial and error to make sure the finished fitted top drapes nicely. I suggest basting the proposed dart and then trying the top on to ensure it hangs correctly, then adjusting if required.
Once you are happy with your proposed dart fold the fabric for the second dart, ensuring the fold is the same distance from the side seam as the original fold from the original side seam. Mark a corresponding dart sewing line with tailors chalk.


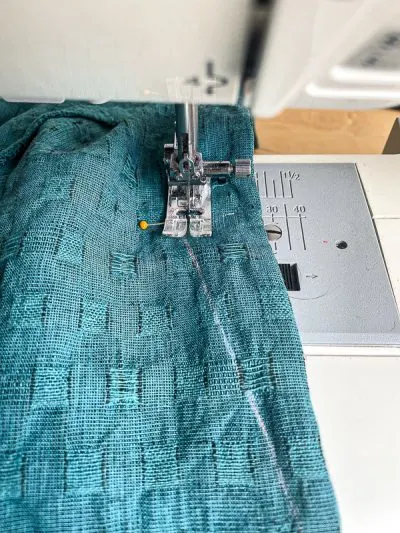
Sew along the marked stitching line, sewing off the edge of the fabric. Tie knots in the thread at the ends of the dart to prevent the stitching from coming undone (this gives a more professional finish to the front of the dart than if you backstitch).

Repeat for the second long dart.
As always with sewing press the finished darts, with the excess fabric pointing towards the center back of the top, a pressing ham is a good idea for a crisp tip of the dart. Your original flat piece of fabric now follows your curved shape.

Tips for sewing perfect darts:
- Stitch from the widest point of the dart to the end point.
- Start stitching at the middle of the dart using a medium stitch length such as 2.5, an inch before the end of the dart alter the stitch length to 1.0, as this will help the dart from unravelling.
- Do not backstitch at the end point of the dart as this can cause puckering. Instead, tie the loose ends of threads in a knot.
- Press with a tailor’s ham to get a nice shape at the point of the finished dart. A tailors ham is similar to a small stuffed pillow that can be placed underneath a garment when pressing to get a crisp point to the finished dart.


Wondering what else was recommended? The stylist advised long scarves and a chunky necklace to compliment my pear shape.
I am keen to prolong the life of clothes for environmental reasons, here are some other popular posts for repairing/altering clothes
- Replace the zipper in jeans
- How to shorten jeans, keeping the original hem
- How to darn a sweater
- How to repair the inner thigh of jeans
Why not get the safety pins out and see if your tops suit you better being a little more fitted?

